Needless to say this year was far better than I could of ever wished or hoped for - but you know how Karma works...it always has a way of coming around full circle and I guess it figured I needed it to come around this Christmas. I started off winning the Cricut Imagine, followed by a Gypsy (with an extra cartridge no less, and all the accessories - in pink!!!), while doing last minute shopping I found a set of Pearlescent chalks and a set of Perfect Pearls on clearance!! A friend of mine bought me a heat gun, so here I come embossing and making my own flowers. I also received gift cards so that I can start to begin my collection of Spellbinders... I only recently learned what they do and I was instantly hooked!!
Christmas day was spent at my step brothers and his wife's home along with rest of the family. Let me tell all of you how great they were. This year I had overspent as normal, but wasn't able to really buy like I enjoy doing, so I really didn't expect much. Actually my mom took a couple of gifts they had bought me over to the house so I would have something to open also while they were exchanging gifts. Well she didn't have to!! I received amazing gifts from all of them!! I was so happy I could not explain in words. Some of my relatives also sent me gifts this year. I think they were trying to make up for last year which I spent alone packing my home as I had signed paperwork several days earlier having to lose my home..it by far was worse Christmas ever for me. I would however will never forget my neighbors that had me over for dinner and I had a wonderful time with them on Christmas eve, they opened their home to me and even on Christmas day my neighbor and her mother brought over trays and dishes loaded with tons of food and deserts!! They knew I was alone and hadn't thought of cooking and they would be gone most of day and wanted to make sure I had plenty of Holiday cheer!!
Friday, December 31, 2010

Wednesday, December 29, 2010
Waterfall Card
Well I just received permission to share this tutorial!! I loved it and really enjoyed making the cards. It is a waterfall Card by Suzanne Saltwell, the original tutorial can be found at http://www.joannasheen.com/tuition-advice/waterfall-card-instructions-by-suzanne-saltwell/.
Many people have asked how to make a waterfall card, so for all of them and anyone else who want’s to have a go at a very different and fantastic looking card; here is how to make one

The waterfall design is easier than you think to create and hopefully if you follow the instructions, you will find this to be so - the key is in the preparation of the cutting of the card and paper
The equipment needed for this project is as follows:-
Joanna Sheen unmounted cat stamps and acrylic block
White Stazon
6 silver brads
A tassel - this one is black and white
Japanese screw punch
3 A4 sheets of silvery card stock
2 A4 sheets of gloss black paper
2 A4 sheets of pearl white paper

No. 1 - A4 silver sheet and score in half to make your A5 card - put to one side
No. 2 - 1 x Black gloss paper cut to 5.5" x 7.75"
No. 3 - 1 x Silver or any other card cut to 5.5 x 2.5"
No. 4 - 1 x Black gloss paper cut to 5.5" x 2.5"
No. 5 - 1 x Silver 9.25" x 3"
No. 6 - 4 x Silver card cut to 3" x 3"
No. 7 - 4 x Black gloss cut to 1/8th of an inch smaller than the 3" squares
No. 8 - 4 x White pearl cut to 1/8th of an inch smaller than the black gloss paper above
No. 9 not shown is 1 X Black gloss cut to 5" x 2.75" then 1 x white pearl paper cut to 1/8th of an inch smaller than the black paper - this is for the inside pull down piece of the waterfall feature.


Once dry attach the piece no. 3 card to the back of the small stamped paper - this is to strengthen the paper as it will hold the waterfall pull - once this is done place the piece back on top of the larger sheet & make 3 holes each side with your Japanese screw punch - set to one side.


Then fold each of the lines to create the front part of the waterfall attachment.


The card is now complete and ready for you to pull the tassel and see the card in full display
Many people have asked how to make a waterfall card, so for all of them and anyone else who want’s to have a go at a very different and fantastic looking card; here is how to make one

Step One
This waterfall card has been adapted in size to work with Joanna’s Cat stamps -The waterfall design is easier than you think to create and hopefully if you follow the instructions, you will find this to be so - the key is in the preparation of the cutting of the card and paper
The equipment needed for this project is as follows:-
Joanna Sheen unmounted cat stamps and acrylic block
White Stazon
6 silver brads
A tassel - this one is black and white
Japanese screw punch
3 A4 sheets of silvery card stock
2 A4 sheets of gloss black paper
2 A4 sheets of pearl white paper

Step Two
On this photo I have numbered the pieces for your reference - so you need to prepare the followingNo. 1 - A4 silver sheet and score in half to make your A5 card - put to one side
No. 2 - 1 x Black gloss paper cut to 5.5" x 7.75"
No. 3 - 1 x Silver or any other card cut to 5.5 x 2.5"
No. 4 - 1 x Black gloss paper cut to 5.5" x 2.5"
No. 5 - 1 x Silver 9.25" x 3"
No. 6 - 4 x Silver card cut to 3" x 3"
No. 7 - 4 x Black gloss cut to 1/8th of an inch smaller than the 3" squares
No. 8 - 4 x White pearl cut to 1/8th of an inch smaller than the black gloss paper above
No. 9 not shown is 1 X Black gloss cut to 5" x 2.75" then 1 x white pearl paper cut to 1/8th of an inch smaller than the black paper - this is for the inside pull down piece of the waterfall feature.

Step Three
Right now for the fun part, take the Black gloss paper no.2 and no.4 and place the smaller piece on top of the larger sheet 1.5" from the bottom.
Step Four
Now for the stamping - using white Stazon stamp your images over the paper ensuring you overlap the image on the smaller piece of paper - this is to blend the paper into one as the top part is the key part to making the waterfall card work.
Step Five
Once finished set your stamped paper to one side to allow drying.Once dry attach the piece no. 3 card to the back of the small stamped paper - this is to strengthen the paper as it will hold the waterfall pull - once this is done place the piece back on top of the larger sheet & make 3 holes each side with your Japanese screw punch - set to one side.

Step Six
Stamp designs - I have done one here in black on white to make it show up easier - but yours will be on the black paper, the five other cat designs can be any of your choice.
Step Seven
Take your waterfall piece no 5 - the 9.25 x 3 silver strip and score an embossed line horizontally - this is done at 2" - 2.75" - 3.5" and finally one at 4.25"Then fold each of the lines to create the front part of the waterfall attachment.

Step Eight
Then take the silver 3" squares and attach the slightly smaller black matting squares onto the silver and matt the white stamped image onto the black.
Step Nine
Also do the same with the larger stamped image - this is the back of the waterfall pull - and attach the tassel to the bottom centre.
Step Ten
Take your scored waterfall piece and attach the stamped squares starting from the bottom scored line. Attach with Double sided tape and continue to do this with all of the remaining three images - this is shown on the image on the right.
Step Eleven
Once you have completed all four squares, the waterfall attachment will look like this - with the tassel lying behind the card - this is the bit that is tucked behind the small piece of card and makes the pull of the waterfall card.
Step Twelve
Attach the bottom of the waterfall attachment to the smaller black stamped piece (piece no.4).
Step Thirteen
Attach the large stamped image to the A5 main card and place the smaller stamped piece with the 6 holes on with the images & line up as you stamped then punch through the card to make the holes right the way through - now put the right hand (the waterfall part) onto the left hand part the main card - with the larger image and the tassel falling behind the horizontal stamped black part and attach to the main card with the 6 brads.The card is now complete and ready for you to pull the tassel and see the card in full display
Tuesday, December 28, 2010
Mini Prima Roses
I have been looking at tons of videos on making flowers, and I must say this was fantastic!! As my mom loves these mini flowers and I am always searching for colors to match her layout this will now save me hours searching! I hope you enjoy it. Kathy from http://paperphenomenon.blogspot.com/ did this tutorial and does all types of paper crafts, I know I will be spending time on her blog! Enjoy tutorial!
Saturday, December 25, 2010
Christmas 2010
I hope everyone Holiday is everything they wished and hoped for and more!
Since I recently moved to Ohio, my winter clothes are very low. My parents got me all kinds of heavy tops and a beautiful winter coat! I also received a nice variety of scrap booking items this season.
So between my new Imagine (thank you Kim) and my Gypsy and heat tool and various gift cards for craft stores I will be very busy crafting and creating! Cannot wait to get started.
Today we will spend with my step-brother and his wife, I cannot wait to get over there! They have a beautiful home that was recently finished and Diane has an amazing gift of decorating so it will be fun to see what she has done to their home. It will be packed with all the family members and friends and I am sure tons of food as well.
I had told my parents that my oldest Neola loves to open presents, and they got to see her in action. After the first one my mom said wait I need to get camera..they laughed and she grabbed the paper with her teeth and would tear open the gifts. I will post photo's when I get them, she is a silly girl.
I am off to get ready for the day...be safe everyone and have a great holiday!
Wednesday, December 22, 2010
Stair Step Card
This is the first tutorial with many more to come and I go through my bookmarks. I decided to go through them to get permission and begin adding them to my blog. If you have a nice tutorial to share please contact me, include link to page and please add that you are owner and giving me permission. I will always give credit and add a link back to original page. To help others, if you use this style and find a hint or trick please share leave a comment.
These directions came from Amy from U Stamp for fun her blog is here http://ustamp4fun.com/autumn-days-stair-step-card/ She has a site full of wonderful tutorials, I will be spending time going through it. She has given me permission to use her instructions. Hope you enjoy, I already used this style to make 2 cards tonight for my parents...one was used to hold a gift card.
Autumn Day Stair Step Card
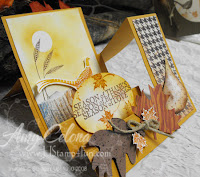


This simple "Stair Step" card was inspired by a swap I received at convention. I thought that it was a unique way to show off several layers of interest before main card. And it stands nicely too! I’ve seen it before without the side ‘bar’ (seen here with herringbone patterned paper) however without it, it isn’t very strong. You can be sure the you’ll see me use it more.


SETS: Autumn Days, Harvest Home, Woodgrain, Itty Bitty Bkgnds
PAPER: More Mustard, Vanilla, Close to Cocoa, Autumn Meadows Designer Series Paper
ACCESSORIES: Sizzix Big Shot, Sizzix ‘Originals” Leaves #2 die, Ovals die, Two standard cutting pads. Basic Brown ink, sponge daubers, More Mustard ink
Markers: Real Rust, More Mustard, Close to Cocoa, ¾ inch circle punch, Natural hemp, Dimensionals

MEASUREMENTS
5 ½ x 8 ½ More Mustard cardstock (scored as shown in diagram)
–Scored on the 5 ½ side at 2 inches
–Scored on the 8 ½ inch side at 2 ¼, 4 ¼, 5 ½, 6 ½, 7 ¼
3 ¼ x 4 More Mustard cardstock (to frame focal image)
3 x 3 ¾ Vanilla cardstock (for focal image)
3 ¼ x 1 inch ‘rustic wood’ paper “Autumn Meadows” DSP
4 x 2 Vanilla cardstock (to stamp pheasant & leaves for cutting)
2 ½ x 3 ½ Vanilla cardstock (to cut Sizzix Oval)
3 ¾ x 2 inch Cocoa (for Sizzix leaf)
3 x 2 ¼ golden woodgrain design “Autumn Meadows” dsp
1 ¾ x 4 brown checked design ‘Autumn Meadows” dsp
Score on lines shows in diagram, then cut from 2 1/4 to 7 1/2 along 2" score. Bend and fold accordingly. Use photos to help you bend.
My personal notes: don't make back part to high and heavy it causes whole thing not to set right. This card looked complicated but I learned was very easy to make. I also like that you take one sheet of 8 1/2 x 11 and you can make two cards out of it.
Sunday, December 19, 2010
I have been thinking
I have been so busy getting ready for holidays, making cards, buying gifts, while also trying to make time to play with my new toys. I just got a Gypsy and stumbling through learning how to use it. The gypsy and the Imagine are going to get a healthy workout together!!
Since I love the idea about blog candy, the idea of sharing things, and I love giving things away - I think I have come up with a solution. I want to find some designers that make files for Cricut, or just digital stamps. And let followers leave comments to decide which designer each month will win some blog candy. Then let followers create something from that particular image. Submit a photo and the original designer will pick who gets that blog candy. I think this will be great way to share, learn and discover new tricks and ideas.
So I guess for now I need to work on getting more followers and see if anyone has an interest in the design part.
Christmas is right around the corner and I am so not ready for it, I need to make 5 nice cards to hold money for my nephews. They are to big for toys so at their age I think money would be best choice for them.
I am diving in head first into embossing, I have owned all of the supplies for a long time now, just never was ready to take the dive. I think once I start that will be it - I will be embossing everything LOL. And I now learned that Cutters Creek carries all 24 colors of glitter cardstock (I never knew they made 12 x 12 sheets) So I am excited about getting that paper - the endless possibilities I can do with that! And I love glitter!!!!
Hope everyone is having a safe and wonderful holiday season!!
Jackie
Subscribe to:
Posts (Atom)