About the creators

I wanted to take a moment and thank all of the people that have allowed me to share their work. All of the postings have the links to the original posting - click on the name of their site. If you find something that you really enjoy please take a minute to go to their site and leave them some love!! Without them, without their permission this would not exist. I try not to get to many from one person - unless what they have is so unique. I do not get anything in return from them...but let them know you found them here with me Jackie at Glitter Fantasies.
Showing posts with label tutorial. Show all posts

Friday, April 29, 2011

A Touch of Grace

There are a  few reasons that I love blog hops...forget the chance to win something - discovering new blogs is my favorite part!! Jerri with A Touch of Grace happens to be one of them. She amazing and her site is packed with tutorials, ideas, techniques..basically, everything you could hope for!


If you have been following me or even have just gone through my blog you have discovered I love making my own flowers!! Jerri has put together a GREAT tutorial series on making flowers that you must see!!
I strongly suggest visiting her, here is the link for the flower and embossing tutorials.  Trust me when I say you are going to want to spend some time over there and be sure to sign up for her mailing so you don't miss anything! One other tutorial she has is a very unique idea for adding texture to leaves - I loved it and will definitely be trying it!!
I could sit here and keep adding links for a very long time..but I will let you head over and look around. Jerri is also Copic Certified, an alumni for Split Coast Stampers, design team for Spellbinders, and she even has her own boutique! Needless to say she is very busy with an abundance of creativity! I had contacted her with a few questions and she was more than happy to answer them ( I am having embossing issues!! )

To find her boutique


Friday, April 22, 2011

Peppermint Bunnies

Ok you have to admit these are the cutest things ever!!! Cheryl at CardbyCG made this and I instantly wished I had found it earlier to make some for work!! There is always next year..or maybe a ghost for Halloween....a snowman for winter holidays...ohh my mind is working overtime to find an excuse to make some of these!!!! Hmm and Sam's Club carries these in bulk hehe.


 My sons and I are making these cute bunnies for classroom goodies for Easter.  They turned out so cute! :)

First off, I know you are thinking it already...
"Where in the heck is the Gypsy cut file for these A-DOR-A-BLE bunnies? Cheryl always shares her Gypsy files!!"
Well, here it is:

To make these yummy bunnies you'll need a Gypsy, the Gypsy Wanderings cart and these other supplies:
Peachy Keen face parts stamp set (or draw on the face by hand)
ATG glue or other glue runner
Scotch Quick Dry Glue
Tweezers
tape
Ink pad 
Peppermint patties candies

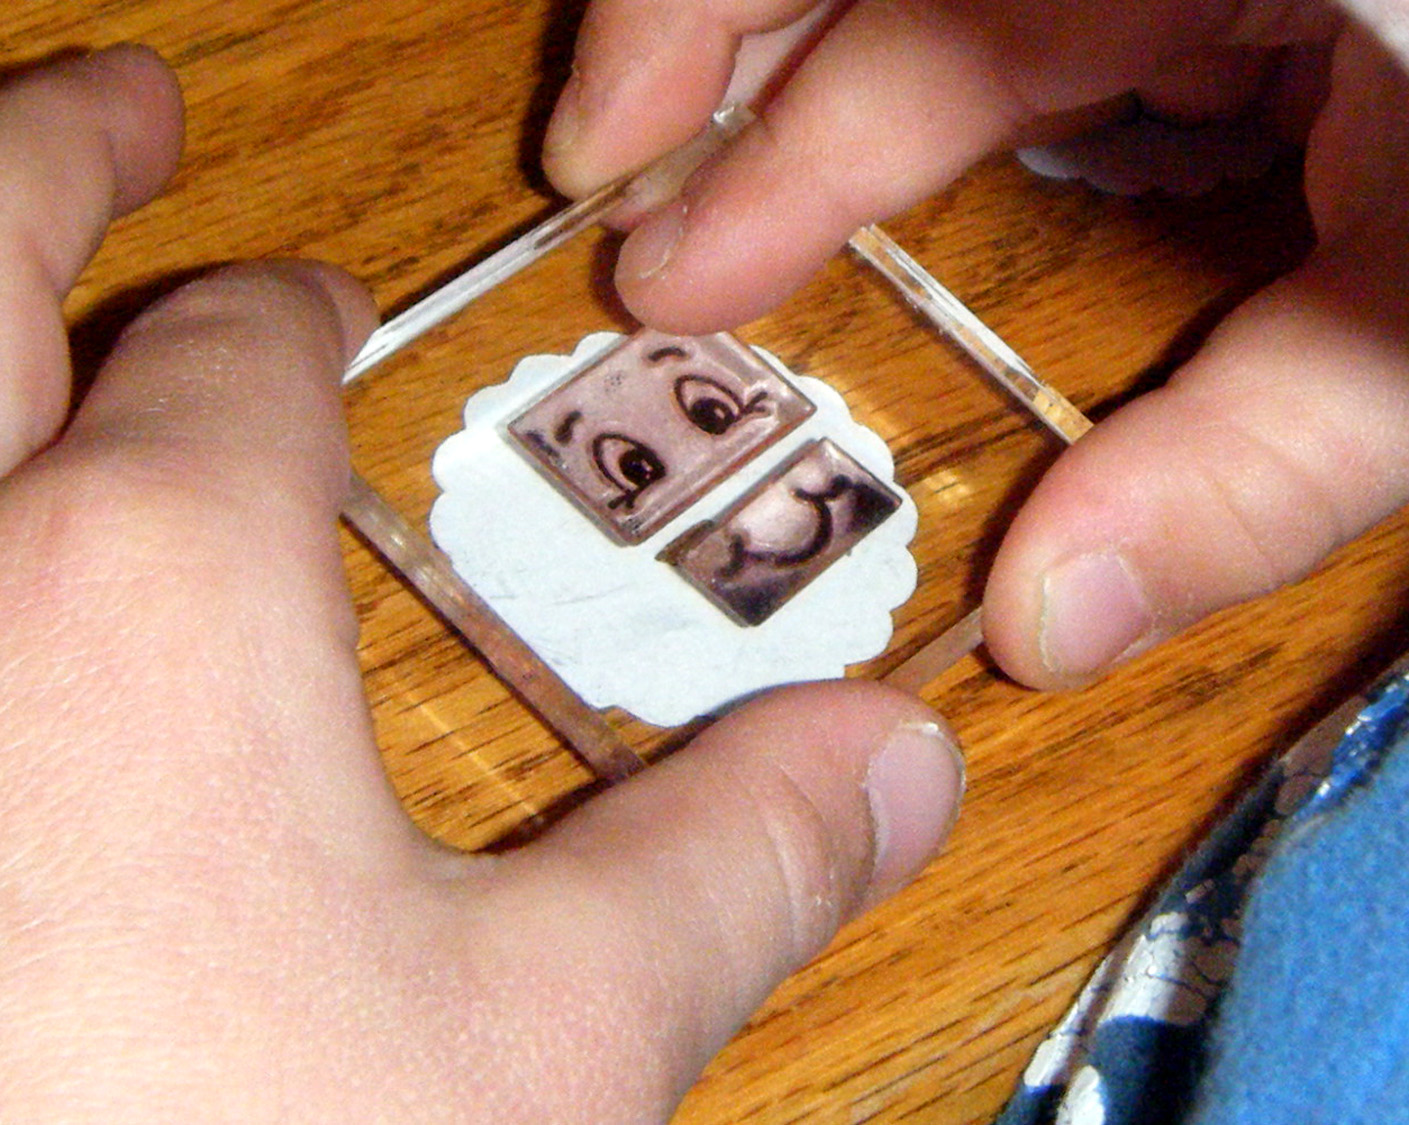
See how cute a personalized stamp is? I love these and they only cost $6 each.
We cut out all out pieces on the Gypsy. On my file you'll see one layer for the head (including the welded ears), one layer for the faces (including the nose cut out), and one layer for the inside of the ears.

With the noses cut out of the faces, we just lined up some Peachy Keen face parts on our stamp block.

Then we flipped our faces and taped a piece of pink card stock to the cover the nose hole.

We also glued on the inside of the ears using Scotch Quick Dry Glue.
How do you like our bunny parts? :)

Next I applied ATG tape to the face and head pieces and my boys put them all together, sandwiching the peppermint patties in-between.  So cute and they really don't take too long. We put 50 of them together in just over an hour.

Here are our happy bunnies.

What an adorable side shot, huh!

We made a tag to match our bunnies.  Here I clipped off the ends of the ear parts. The "Happy Easter" stamp is from Close to my Heart.

We put 25 of the bunnies in one of these $1.50 paint pails from Joann's. We added some plastic Easter grass and some sheer ribbon to the outside and we were done.

So cute right!  Now download the Gypsy file and take some time to craft with your kids today! 
In case you missed it earlier, here is the Gypsy file again:


post signature

Tuesday, April 19, 2011

Calendar Card

As I was looking around Jo's site It's My Creative World I came across this amazing calendar card!! She use to teach card making and has taught this one...maybe she can be persuaded to make a tutorial on this. I don't know about you, but I thought this was absolutely amazing beyond words. It looks like a lot of work...but imagine giving this to someone - they would be thrilled to receive this!!

Don't you agree this definitely belongs to be a part of this blog!!

I haven't used my Tombow makers in a long time but broke them out for this. I like the way the fur looks on the kitten.

Here is the card opened a little

This is the calendar up close a bit.


Open a little more.

I found a web site on line that you can download the calendar. (There was no link but if I find it I will add it to this).

You can make this card simple or really fancy with embellishments and decorative papers.

Dryer Sheet Technique

Well I am a happy blogger today, Jo with It's My Creative World has given me permission to share some of her unique tutorials!! Be sure to visit her site...never know what else she has over there. She also has a nice selection of cards that she has made, I saw some for almost every occasion!
Here is the first one that really caught my attention...hmmm imagine using a new one for a summer card - seeing and smelling fresh flower scent?? Yes?? I love trying to see if I can find different ways to do things. Her tutorials are so well done!!


Dryer Sheet Technique
Items needed for project:
Used dryer sheet
Various cardstock for your card and ribbon (optional)
Dazzling Diamonds glitter or one like it
A printed digi image (you can also use a rubber stamped image)
Type of adhesive such as Xyron, glue stick, double sided adhesive sheets or spray adhesive

This is a very simple technique to do. I will show three different adhesives used. The glue stick, double sided adhesive and Xyron.
Glue Stick

  1. 1. Cut your used dryer sheet about ¼ inch bigger than you stamp image.
    2. You will take your printed or stamped image and cover the entire surface (the image side) with glue stick. Make sure you get all the way to the edges.
    3. Carefully lay your dryer sheet over the glue and smooth down. It might be a little bumpy in spots but that is ok because it just gives it more dimensions.
    4. Now turn you image over and adhere the extra to the back of the cardstock (you can cut the extra off but this gives it a more finished look).
I used a double sided tape so that is would show up in the picture. You can just use the glue stick as well.
This is what is should look like after you have either trimmed or adhered the excess to the back.
5. Turn you image back over and sprinkle the glitter over the entire image and tap excess off. I use a coffee filter to catch excess glitter for reuse.
This is where the real beauty shows. Got to love glitter!

Next up : Double sided adhesive sheet. You will notice that it has a slight tint and relatively even. Some may like this look. I used one call Therm O Web for my double sided adhesive.
Double sided adhesive sheet
Apply the double sided adhesive sheet over your image and cut down to size. Once this is complete peel to expose your adhesive then follow steps 3, 4 and 5 from Glue Stick method.


Next Up: Xyron
Xyron

Run your image through your Xyron machine. Make sure you put your image through the Xyron upside down so that the adhesive will be on the front of the image Once this is complete peel to expose your adhesive then follow steps 3, 4 and 5 from Glue Stick method.

You will notice that this is similar to the Glue stick method as far as appearance.


Here is a shot of all three methods I used here for you to compare.


The next part is up to your creativity, putting a card together. I have photos of each method used with my card design. I think a snow scene or a stained glass image would look really nice using this technique.


I hope you enjoyed this and that it will inspire you to try making cards and projects using this technique. I know that this goes back a number of years but seems to have resurfaced again. As they say,”something old is new again”.

Here are a few that she made....

This is done using Stampin Up stamps. I used a dryer sheet over the images using a glue stick and then sprinkled glitter on to the while the glue is still wet.

This is the same technique just done with fall colors.


Sunday, April 17, 2011

Canvas...Creating art beyond your scrapbook!!


I had seen this done and I was blown away and how wonderful they looked!. Do you have a special moment, or want to create a beautiful piece of art for someone? Here is the solution - take your scrapbook page and move it out of the scrapbook to create a one of a kind piece of art that can be hung or displayed. Not sure where to begin, the let Canvas Corp show you supplies and how to create your own masterpiece. While they are giving their site a make-over you can head over to their blog Canvas Corp for even more idea, challenges and prizes. The possibilities are endless, and with ideas being shared and all of the resources here - your new passion is just a click away...what are you waiting for??


With a complete online resource nothing should hold you back now!!  Here is a peek at what you will find with them....I got lost on their site looking around!!

With a feature Friday, you will see something new every week to try - and with a list of supplies and photos. Here is the current Feature Friday...with all the details on the site.


In the Let's Get Creative section you will find ideas and projects to get you started and keep you going!! Are you wondering how to move from your paper to canvas...they have a number of helpful hints and ideas to get you there...check out this amazing piece!!!


Let's Craft - more ideas and projects along with contests like this one - making banners!! Already thinking about the projects you can create??? Learn how to using other mediums like burlap here!


You have taken the plunge and have decided to create your own art...In the section Let's Decorate you can find even more ideas and and learn how to display it! I just love this photo wreath!!


Don't miss out on Let's Design, where you learn how to transform your area with help from professionals..they even have a kit you can buy to learn HomeSpacing. IMHO I thought this was great!! I don't know how many times I have rearranged and decorated so I could get the right look and feel in a room!
http://blog.canvascorpcrafts.com/files/2010/10/step-4-design-board.jpg

And don't forget to check out Love It! where they will showcase projects from all over!

With all of this at the click of a mouse....what are you waiting for??

Thursday, April 14, 2011

Copics To Copic of Not...That is the Question..

Last night I was talking with Dana from the group Split Coast Stampers. I had just been asking a variety of questions unrelated to each other (learning all sorts of lil tid bits!!). Then she made one comment - and it caught my attention completely!! "I just love my Copics!!" All I could think of was why????? The cost, wasn't impressed with what I thought was a competitors brand, they don't last long, ruining the tips when you blend - these were reasons I never looked twice at them. You know me...I asked why and brought up all my reasons - in some detail so she really understood. Her response to me...will forever more change my view - thus the need to Copic!! So let's go Copic!!

First off the very basics:

The main differences
-The number of colors available
-Airbrush Compatibility
-Ink Capacity
-Nib Types
-All use same refills (which are very inexpensive!! Bonus!)
Sketch Marker is available in 344 colors - shares nibs with Ciao
Copic Marker comes in  214 colors - most nib choices - these only fit Copic
Ciao is available in 144 colors - holds least amount of ink, won't fit into airbrush system
Airbrush Systems, you will want to purchase only the Sketch and Copic Markers.  The body of the Ciao marker is too small to fit into the Copic Air Grip. I strongly suggest searching videos if you have never seen this - very unique and amazing effects.


Want to know what a Copic is...well the best place to begin at Copic. Of course they are loaded with everything - you can even d/l their color charts to keep track of which ones you have. I called them as I was overwhelmed as to where to start my collection - yes they have help for that!! All you need is a basic starting color and they will help to choose 3 colors that will work well together with their color palette.


By now I am sure you have checked out pricing..ouch I know!! So I did a little bit more research on where others purchased them. A number of companies were pointed out, and some clubs as well - I don't mind signing up if it means great pricing..but customer service and shipping has to all be there as well. To narrow down one company at times seemed difficult, but once again Dana to the rescue!! She recommended Oozak.com and since she obviously knew her stuff when it came to Copics I took her word and headed over to Oozak, set up an account and placed my first order! All I can say is she has now been correct 100%, they don't even nail you on shipping!!!! I see a bright future with Copics (and without breaking the bank!!!).  Next step....Learn!!

Now that we have the details out of the way...let's have fun and see what people are doing!!!

If you haven't figured it out I love You Tube!! As I was drowning myself silly in videos in the side panel was one marked Copic Basics : A Beginner's Tutorial - well hey perfect for me!!! This is not a company that sell it...as I began watching it I realized I was completely consumed IMHO Suzanne really does an excellent job at explaining AND showing what the basics are, I will admit I learned a lot from her and even subscribed to her. I hope you enjoy her tutorial as much as I did!!!


You know I will be adding to this as I discover this Copic world!! LOL are you realizing that I truly had no clue about these!! I have been led to people that are amazing with their Copics and will be adding tutorials and links as soon as I get it all sorted out!
Until next time....

Sunday, April 10, 2011

Melanie Muenchinger Stamps

Here is one more designer that I think everyone will find something they love. You have most likely heard of Melanie Muenchinger, her site is Hands, Head and Heart where you will find it loaded with ideas using her stamps, helpful hints and also for specific sets and to many tutorials and ideas to count. Gina K of course with Gina K Designs and Stamp TV carries all of her sets. Gink K did a blog hop over the weekend and I discovered the world of Melanie Muenchinger - the stamps below are ones on the top of my very long wish list. She has so many different sets for any occasion - but you know me flowers and butterflies are my weakness!!!

She is an Illustrator and Senior Designer
And you are about to find out why!!!

To get an idea of her style and some of her sets I decided this time to show the whole set and one project - and of course follow the the item description to get your own set and the other link to see how to create what you see!!! All projects were completed by Melanie herself (I do believe) No they are not in any sort of order - however, I am going to show the first sets that I discovered over the weekend....starting with!!!

http://www.shop.ginakdesigns.com/images/BringtheBling.gif 
This is the very first set of hers that caught my attention!
Imagine not only stamping these - but embossing them!!!! These are screaming to be embossed IMHO.
This set is actually very versatile to me...think of all the things you could do with them individually.
I saw one card where the a second center flower was cut out and popped up onto whole array.
http://www.shop.ginakdesigns.com/images/Ayearofborders.gif
You know I had to show sets with butterflies!
 
Choosing one more to show you was almost impossible to decide...