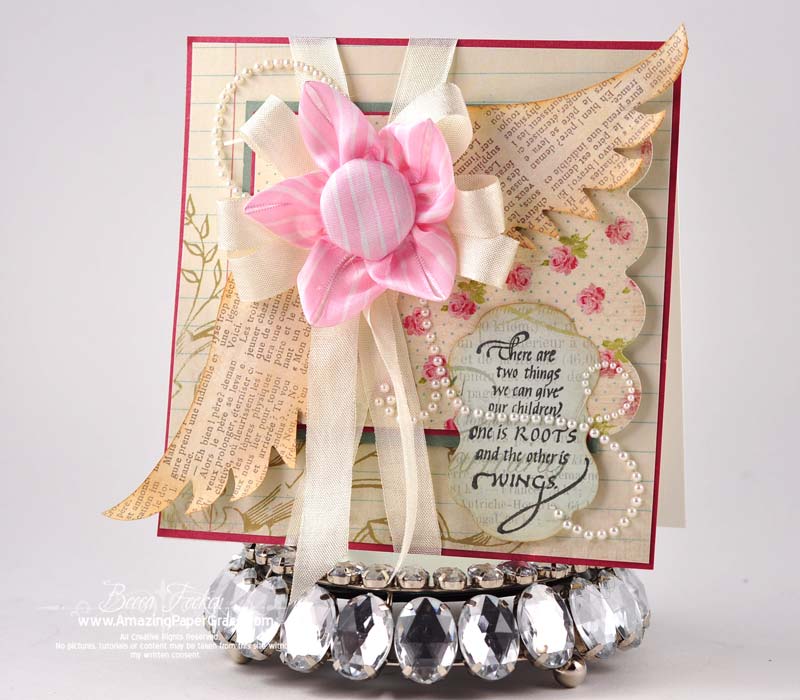
Once again Becca has done it again! I think she dreams about making bows in her sleep. She does explain what she used to make this stunning card - BUT - and this is the BEST part!! She made a video on how to make the bow!!!!! So head on over to Amazing Grace Papers and learn how you to can make this lovely card!! Don't worry, it looks as if it would be hard to make - never fear she makes them easy to do!
My blog is my place to save things I love with paper crafts. Leave a comment so I can follow you. So grab a cup of something to drink and look around, if you have something to share drop me a message - Enjoy!! On a side note, as much as I would love to take credit for the amazing work you will find here...credits are listed at top of each post.
About the creators
I wanted to take a moment and thank all of the people that have allowed me to share their work. All of the postings have the links to the original posting - click on the name of their site. If you find something that you really enjoy please take a minute to go to their site and leave them some love!! Without them, without their permission this would not exist. I try not to get to many from one person - unless what they have is so unique. I do not get anything in return from them...but let them know you found them here with me Jackie at Glitter Fantasies.
Showing posts with label ribbon. Show all posts
Wednesday, April 6, 2011
Tuesday, February 22, 2011
The BEST way to store ribbon
Well I have been busy poking around Becca's site, Amazing Paper Grace and as you most likely noticed I have a few posts about her. Well, I thought her ideas were pretty good and knew that for storage I had found what I was going to do as well as completely love her projects! And as always here is the link to the original posting http://www.amazingpapergrace.com/amazing-ribbon-storage/
However, after seeing this idea for storing ribbon (which I have far to many rolls) I have the under the bed bins (3 of them), half a dozen large boxes plus several of the huge bags from shopping full of ribbon. Until now I was going to use the ribbon rings but dreaded at how many I would need. I already own 3 of the 3 drawer storage containers that are close to what she has. Needless to say I am over the top about this idea and cannot wait to get all of my ribbon organized. I guess you want to see what she came up with...well here it is!!
Can I tell you that I am a ribbon-aholic? I don’t know what it is, but when I see it, I just have to have more. Even worse when I’m working on a project I don’t always feel like I have just the right ribbon. Yup,…never fear, I’ll just get more. Then, just how to store it? Well, I have tried everything….rain gutters, tossing all in a big jar, ribbon rolls on cafe rods…and I found that my collection was just too unwieldy. After thinking about, I decided that it’s the round rolls that make up all the bulk so I took the plunge and decided to get rid of that bulk.
To begin I purchased one of these three drawer units from Michaels for around $10.00, a package of small black hair rubber bands and purchased a sheet of mat board which I cut down into pieces measuring 2.5″ wide by 2″ high. I decided on the matboard because I found cardboard bobbins you can purchase at the craft store to be too small and too flimsy. I divided the drawers into four sections by putting in three 13″ pieces of matboard and anchoring them with tape. I rolled all my ribbon that were lengths of 5 yards and less onto the bobbins that I had cut. Now, just a warning, the rolling of the ribbon takes a little bit of time. I saved it by rolling when I was watching TV and even carried a small bag of ribbon and bobbins in the car to roll while I was waiting in the car or at the doctor office.
But here’s the thing…..it’s amazing the amount of ribbon one three drawer unit will store! In the picture below, 1 drawer can hold 140 rolls of ribbon; this particular unit is storing more than 400 rolls of ribbon!! I love this storage because I can pull a drawer or the entire unit and set it on the edge of my workspace.

Here are the drawers opened up to show how easy it is to pack and stack the ribbons inside the drawer.

Here is what one of the individual bobbins looks like. It is simply a piece of matboard cut to 2.5″ x 2″ secured with a rubber band.

I have three of these units all together. The top drawers are devoted to my American Crafts Ribbons. Those are not stored on bobbins. The rolls are smaller and since they come packaged in sets of six, I wanted to keep each mini palette together (shown below).

Even storing the American Crafts as full ribbons, I can get a whopping 88 rolls in one drawer!
However, after seeing this idea for storing ribbon (which I have far to many rolls) I have the under the bed bins (3 of them), half a dozen large boxes plus several of the huge bags from shopping full of ribbon. Until now I was going to use the ribbon rings but dreaded at how many I would need. I already own 3 of the 3 drawer storage containers that are close to what she has. Needless to say I am over the top about this idea and cannot wait to get all of my ribbon organized. I guess you want to see what she came up with...well here it is!!
Amazing Ribbon Storage That I Absolutely Love
by Becca Feeken on February 23, 2008
To begin I purchased one of these three drawer units from Michaels for around $10.00, a package of small black hair rubber bands and purchased a sheet of mat board which I cut down into pieces measuring 2.5″ wide by 2″ high. I decided on the matboard because I found cardboard bobbins you can purchase at the craft store to be too small and too flimsy. I divided the drawers into four sections by putting in three 13″ pieces of matboard and anchoring them with tape. I rolled all my ribbon that were lengths of 5 yards and less onto the bobbins that I had cut. Now, just a warning, the rolling of the ribbon takes a little bit of time. I saved it by rolling when I was watching TV and even carried a small bag of ribbon and bobbins in the car to roll while I was waiting in the car or at the doctor office.
But here’s the thing…..it’s amazing the amount of ribbon one three drawer unit will store! In the picture below, 1 drawer can hold 140 rolls of ribbon; this particular unit is storing more than 400 rolls of ribbon!! I love this storage because I can pull a drawer or the entire unit and set it on the edge of my workspace.
Here are the drawers opened up to show how easy it is to pack and stack the ribbons inside the drawer.
Here is what one of the individual bobbins looks like. It is simply a piece of matboard cut to 2.5″ x 2″ secured with a rubber band.
I have three of these units all together. The top drawers are devoted to my American Crafts Ribbons. Those are not stored on bobbins. The rolls are smaller and since they come packaged in sets of six, I wanted to keep each mini palette together (shown below).
Even storing the American Crafts as full ribbons, I can get a whopping 88 rolls in one drawer!
Monday, January 31, 2011
1/2" Seam Binding Ribbon Bow
As you will quickly realize I love ribbon and bows!! I saw this one and absolutely thought this was the greatest little trick I have ever seen!! Dawn from Stampin 'Up learned this at Leadership and made a video tutorial on it. I hope you love this as much as I do! Dawn does a lot of tutorials, hop on over to her place and check it out. You can even sign up for her mailing list - I did that's how I got this!
Here is the card with the ribbon, notice the ribbon and how it looks scrunched? Believe it or not, it is very easy to do!!
Here is link to the video
STAMPING STUDIO
Here is the card with the ribbon, notice the ribbon and how it looks scrunched? Believe it or not, it is very easy to do!!
Here is link to the video
STAMPING STUDIO
How to make a bow flower
While I was finding the twisted ribbon bow tutorial, I also saw this one and thought this would be great to share as well. I don't know about you but I always have a hard time making bows for packages, and I think these would be great in a small ribbon for a page layout for a "All Wrapped Up" theme. Helen from Scrap-A-Little allows her tutorials to be shared as long as you give credit back to her. So here is another one from Helen and the link to the original tutorial
http://www.scrap-a-little.com/2009/07/tutorial-for-ribbon-roses.html
3 ribbons about 2 1/2"
and 4 ribbons about 4".
Twisted Ribbon Flowers
I had seen one of these on a card and thought it was so cute. I found a tutorial and was given permission to share this. Hope you enjoy these I know I cannot wait to make some. I am going to make myself a nice selection to keep on hand. Helen from Scrap-A-Little made this tutorial, I thought this was the best one I had found and very easy to follow. Here is the link to the original post and she makes tutorials every month along with sketches, so head on over and check it out http://www.scrap-a-little.com/2009/07/tutorial-for-ribbon-roses.html.

I never measure anything; but take two pieces of ribbon about 4" long. They can be the same or different colors. I chose two different here so that it would be easier to see.
Add some glue in one end and put the ribbons on top of each other.
Fold the edges over like shown;

Then starts the tricky part. You really need both hands to do this, but since I had to take a picture too, I'm just using one.Roll up from the folded side about three times.
Then twist the ribbons as you continue to roll it up. The twisting is what gives the rose the volume. If you use two colors, make sure that you alternate between the colors facing up.

Tutorial for ribbon roses
Here is finally the promised tutorial for these cute ribbon roses. All you need is ribbon,craft glue and some scissors.
I never measure anything; but take two pieces of ribbon about 4" long. They can be the same or different colors. I chose two different here so that it would be easier to see.
Add some glue in one end and put the ribbons on top of each other.Fold the edges over like shown;

Then starts the tricky part. You really need both hands to do this, but since I had to take a picture too, I'm just using one.
Then twist the ribbons as you continue to roll it up. The twisting is what gives the rose the volume. If you use two colors, make sure that you alternate between the colors facing up.Experiment with the twisting. Twist more and less and inward and outward. The most important thing is that you always have a so called folded side facing up. Not the actual edge of the ribbon.
I'm really not good with words and explaining, but I hope you can tell from the photos what I mean.
Add glue at the end of the ribbons and tuck them underneath the rose. Then trim the ribbons sticking out.
( These are NOT my favorite colors at all, but since I don't have my stuff yet, I was limited with what they sold on the Base here )

Subscribe to:
Posts (Atom)