About the creators

I wanted to take a moment and thank all of the people that have allowed me to share their work. All of the postings have the links to the original posting - click on the name of their site. If you find something that you really enjoy please take a minute to go to their site and leave them some love!! Without them, without their permission this would not exist. I try not to get to many from one person - unless what they have is so unique. I do not get anything in return from them...but let them know you found them here with me Jackie at Glitter Fantasies.
Showing posts with label tools. Show all posts

Thursday, April 14, 2011

Copics To Copic of Not...That is the Question..

Last night I was talking with Dana from the group Split Coast Stampers. I had just been asking a variety of questions unrelated to each other (learning all sorts of lil tid bits!!). Then she made one comment - and it caught my attention completely!! "I just love my Copics!!" All I could think of was why????? The cost, wasn't impressed with what I thought was a competitors brand, they don't last long, ruining the tips when you blend - these were reasons I never looked twice at them. You know me...I asked why and brought up all my reasons - in some detail so she really understood. Her response to me...will forever more change my view - thus the need to Copic!! So let's go Copic!!

First off the very basics:

The main differences
-The number of colors available
-Airbrush Compatibility
-Ink Capacity
-Nib Types
-All use same refills (which are very inexpensive!! Bonus!)
Sketch Marker is available in 344 colors - shares nibs with Ciao
Copic Marker comes in  214 colors - most nib choices - these only fit Copic
Ciao is available in 144 colors - holds least amount of ink, won't fit into airbrush system
Airbrush Systems, you will want to purchase only the Sketch and Copic Markers.  The body of the Ciao marker is too small to fit into the Copic Air Grip. I strongly suggest searching videos if you have never seen this - very unique and amazing effects.


Want to know what a Copic is...well the best place to begin at Copic. Of course they are loaded with everything - you can even d/l their color charts to keep track of which ones you have. I called them as I was overwhelmed as to where to start my collection - yes they have help for that!! All you need is a basic starting color and they will help to choose 3 colors that will work well together with their color palette.


By now I am sure you have checked out pricing..ouch I know!! So I did a little bit more research on where others purchased them. A number of companies were pointed out, and some clubs as well - I don't mind signing up if it means great pricing..but customer service and shipping has to all be there as well. To narrow down one company at times seemed difficult, but once again Dana to the rescue!! She recommended Oozak.com and since she obviously knew her stuff when it came to Copics I took her word and headed over to Oozak, set up an account and placed my first order! All I can say is she has now been correct 100%, they don't even nail you on shipping!!!! I see a bright future with Copics (and without breaking the bank!!!).  Next step....Learn!!

Now that we have the details out of the way...let's have fun and see what people are doing!!!

If you haven't figured it out I love You Tube!! As I was drowning myself silly in videos in the side panel was one marked Copic Basics : A Beginner's Tutorial - well hey perfect for me!!! This is not a company that sell it...as I began watching it I realized I was completely consumed IMHO Suzanne really does an excellent job at explaining AND showing what the basics are, I will admit I learned a lot from her and even subscribed to her. I hope you enjoy her tutorial as much as I did!!!


You know I will be adding to this as I discover this Copic world!! LOL are you realizing that I truly had no clue about these!! I have been led to people that are amazing with their Copics and will be adding tutorials and links as soon as I get it all sorted out!
Until next time....

Saturday, February 26, 2011

Sew Easy


If you haven't heard about this amazing little gadget and you love the "sewed" look on cards...well here you go!!!! Small, affordable, looks like it is easy to use, using floss not thread (I can imagine it would look really great with floss). Needless to say this is going on my "wish list"..I cannot imagine dragging out my sewing machine and all the hassle for one minute on a card - However, with this you know I will...hehe and I have tons of embroidery thread already!!
Now of course you can find it anywhere, but here is We R Memory Keepers link for it  http://www.weronthenet.com/sew_easy

I was looking around online for images or something to so that you could get an idea on what it did.

Friday, February 25, 2011

Birthday Petals Card

I didn't realize that the other post didn't include directions for the best part - the flower!!! So here it is....Enjoy!! Dawn is making my wish list longer and longer.. I am going to need a par time job so I can get all of the goodies!! Here is original posting...enjoy! http://www.dawnsstampingthoughts.net/2011/02/birthday-petals-card-.html


Birthday Petals card front
Hi Stampers :

 Happy Monday Friends & Happy Presidents Day !
I finally got to use my  Blossoms Petals punch# 121808  along with the 
 Build a Blossom stamp set
  • (c) # 121994
  • (w) # 121923
Love them both !
I use Baja Breeze card stock #111352   and Baja Breeze classic ink #111833   for my card  today.
 I am going to show  you  the inside of my card  later this week via video .. so stinkin cute :)
The Birthday  greeting is from the  stamp set  called
Bring on the Cake
  •  # 121958 (c)
  •  # 121899 ( w)
I also used the  Framed Tulip embossing folder #121809
I addeda small strip of Springtime Vintage  designer paper # 121782  as well as a few Basic Rhinestones #119246.
To  finish off the pretty flower I added lots of Dazzling Diamonds # 102023
Have a Marvelous Monday friends. See you  tomorrow
Until later... Happy Stampin!
 Order Stampin' Up! Online

Tuesday, February 22, 2011

Perfect Reinker Palette

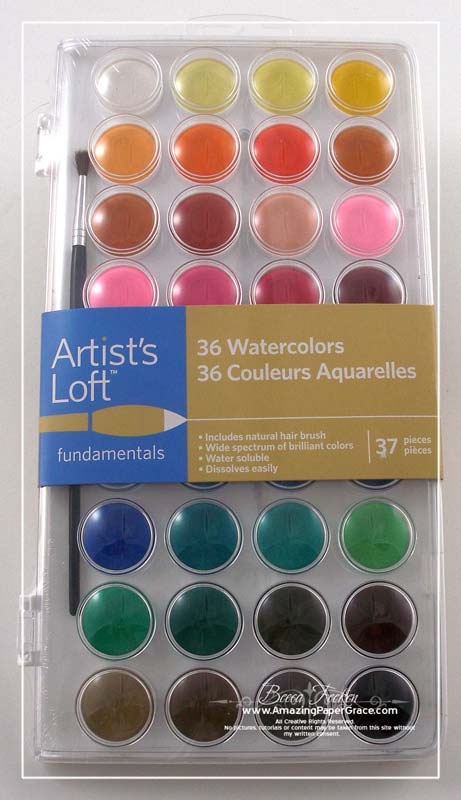
While I was on Becca's site I came across this and thought what a creative way of keeping your inks. And of course my favorite - inexpensive!! If you haven't figured it out, cost and convenience is top priority for me. So without further delay here is what Becca came up with to keep her inks organized and at her fingertips!! And of course the link back http://www.amazingpapergrace.com/perfect-reinker-palette/.


Do you want to learn how to take this inexpensive watercolor set and convert it into a great storage/organizer for your ink bottles....follow the link above and let Becca show you how!

Watercolor Paint Pallette


PSA Essentials

I had seen this a while ago and wasn't 100% sold on it. Don't get me wrong I thought it was a really great idea and cost didn't make me fall over. But I just wasn't there....until!! You Had Me at Craft did a video on how to make an envelope and she used her monogram to make an envelope seal. That sold me, she layered it onto a larger scalloped circle and it was so adorable yet really sharp looking. I am always stumped at how to seal envelopes, esp when the cards are kinda bulky..thick?? This is perfect for that, it is a nice enough size for the seal to really keep it closed. They have a ton of different things...check it out for yourself..never know??? Hmmmm I wonder if you can heat emboss their ink??? I will have to find out!!
Here is link for PSA Essentials...  http://www.psaessentials.com/
I wanted to give you an idea of just how amazing these are so I grabbed a couple images from the site, the outer rings are interchangeable as well as the inner rings so you can mix and match. They also have a variety of colors, even combos for inner and outer parts. You can also do personalized ones - such as your address on outer ring, or handmade by ...can you imagine the endless possibilities. I thought it would be great to have handmade by personalized on inner and outer rings both. They have a nice selection of premade packages...even Rudolph!! Hehe can you tell I am completely excited about these.


Sunday, February 20, 2011

Stork Scissors

These scissors are by far my favorite pair!! I enjoy cutting out images and so forth and to really get the detail these are perfect. My first pair I had for over 10 years and used them all of them time, from cutting ribbon, fabric to paper and everything in between. I had this link saved because the pricing was to low to pass up..so here you go..another of my must - have, can't live without tools.

 http://www.quilling.com


Stork Scissors - 4" - Silver
Code: 174
Price: $5.50
Quantity in Basket: none

Thursday, February 17, 2011

Fave Crafts

I don't know why I haven't added this site to my blog yet - I absolutely love it!! You can sign up for a free newsletter which is packed with ideas. They also have a ton of free EBooks which you can download - and let me tell you what..they are great - jammed packed!! I do believe you can even go back and get older ones. This site has a little bit of everything and the tutorials are well put together and very easy to follow.
Here is the link...enjoy!!
OH..and it is all FREE!! and I love free things..especially when they are well worth it.
http://www.favecrafts.com/

Sunday, February 6, 2011

Ultimate Crafter's Companion

It seems that the most asked question of noobies is what items could you just not live without. I will be Labeling them all with tools, so to see all of them just click on that label.
The Crafter's Companion is my first choice, and pretty much was my first tool I bought. I was making cards and wanted to be able to make my own envelopes - after searching and asking questions I decided this is what I wanted! I saved up and bought this Ultimate Crafters Companion, it cost a little more than just the envelope make but it was well worth it!


Here is link from site

http://www.crafterscompanion.com/The-Ultimate-Crafters-Companion_p_9.html


Part Number CCULT1
The Ultimate Crafter's Companion


I copied this from the site

The all-in-one, compact carry-case which allows you to score, measure, trim, emboss and embellish; create boxes, shaped card blanks, envelopes and so much more… The Ultimate Crafter's Companion is everything you will ever need for your card making projects, in one handy and portable carry case. Includes a 24 full page instruction booklet and a 2 1/2 Hour Project & Instructional DVD which takes you step by step through 12 different projects and detailed instructions.
 
Click here to download a copy of the Instruction Manual
Please Note: This is a very large pdf file (15 mb) and may take a minute to display depending on your connection speed.
 
Click here to download a custom envelope sizing chart
- Create over 100 different custom envelope sizes!


Tuesday, February 1, 2011

Tim Holtz Demo's

After sending off an email with a question about one of his products for whatever reason I went to his site. I looked at the products, his about page...then I found the demo page!! If you weren't a fan before, the demos will certainly change that perspective. For me, the demos really opened my eyes to all the things you can do with just one of the dies. And put them on the top of my "wish lists"!! I definitely had to place the site on my "Wish List" page!!
I really have to say Tim Holtz and his design team are amazing!! I just watched the first video he did under Demos and his dies are so versatile!!! A while back I had seen a butterfly (butterfly's and pink are my favorite things) and fell is love with it. I thought it was on a cart....nope one of his dies. And he shows all the different things you can do with one of them...I was completely floored. I think I am pretty creative and can think outside the box - I have just been shown I don't!! Or at least not as much as I thought I did.... I need to meet this man. I made the decision next year I am going to CHA to meet him.
Some of you might balk at this...but when I heard of Tim Holtz I merely thought he was just a name behind the products and that was the end of it. But the more I look around the more I have realized that he is actually part of the design process. His mind seems to be an endless array of designs and ideas. He is not merely a "front person" but part of it, which to me makes him far more interesting.
I don't own tons of his products as a number of you, but I am slowly acquiring things. And I must admit so far I love everything that I have bought so far. Over the last couple months a couple of craft stores have been putting things on clearance in order to make room for new products and I have grabbed everything I have been able to get my little hands on. One of them is the crackle stuff, I wasn't really sure what to do with it but it looked fun. I bought the last two bottles they had and it sat here for a couple days right here on my desk. I finally opened one up and put some on some holly berries just to see....all I can say is if you don't have some of this you must get some!! It made the berries look so wild!!! And that was it, I was off in search of what others had done with this stuff.
I also had bought some Perfect Pearls...again not 100% sure what to do with them so I was off in search of tutorials. I had found one that he was part of and now understand why he is so energetic and enthusiastic! I guess I can say I am now a die hard fan of Tim Holtz and cannot wait to watch for of his videos to find out what new toy I need to get next!  Well I am off to watch more demos so if I don't post for a while I have gotten lost on his site.

Friday, January 28, 2011

Peachy Keen Stamps

I just got my first set of Peachy Keen Stamps!!! I cannot wait to find any excuse to try them out!! If you haven't heard of the company you must go check it out. I am completely in love with their faces stamps. I think I counted 25 sets I must have...and that is just the faces!!! I called and actually spoke to Kathy who is the President and she creates a majority of the collections ( at least I am pretty sure, I know she mentioned she has been getting some designers, but I believe most of the designs are hers at this point - if I am wrong please let me know). She is really great and takes pride in all of the products - she really told me a lot of things that I didn't realize. I even asked for a catalog so I could really see everything...and I am not a catalog person..for me everything is done online but I had to have hers! I added the blinky on the side that links to them. And I have the link also on my favorites page, duhhh as if they wouldn't belong on my favorites page!!!
You might want to do yourself a HUGE favor and google what people do with the stamps!! The ideas are so adorable and possibilites are endless!! The one that really stuck in my head were vegetables with faces on them. Or, the teddy bear faces for the tear bears..no, actually it was the winter faces....hmmm, no that's not it - I remember it was the cutie pie ones. Oh, who am I kidding I love them all!!!! This first set is kinda a get started one, because the faces can be used on anything (well they all can be). The large sets go for about $25 a set for about 31 - this varies from set to set, this quantity is not set in stone - merely to give you an idea. But if I had to guess I would say average of $1 a piece, and to me it is a great deal!!
Here is the set I got!!! I just had to share it with all of you!! The first image shows just the individual images just large. The second is actual sheet you get in various sizes which are...3/8", 1/2", 5/8", 3/4", 1" and one 1-1/8". There are 6 faces in the various sizes then they also give you one large one on sheet - you cannot pick which one (which I am glad as I would not be able to choose). They do sell each set in each size - but, I would strongly suggest saving your pennies and investing in the one large set.

Wednesday, January 5, 2011

Mat for heat gun

I waited until I received my order to see exactly how good this was, and so far it is working out great. I found it on deal pal, with shipping it was about $5. So if you are needing a heat mat to use for embossing or whatever you use heat gun for here is one at great price!

Here is the link:
http://www.dealpal.com/search.php?q=dealpal&q=betty+crocker+clean+cookin+oven+liner

If the link doesnt work for whatever reason go to dealpal and search betty crocker clean cookin oven liner.

Jackie (Elfy)