This is the first tutorial with many more to come and I go through my bookmarks. I decided to go through them to get permission and begin adding them to my blog. If you have a nice tutorial to share please contact me, include link to page and please add that you are owner and giving me permission. I will always give credit and add a link back to original page. To help others, if you use this style and find a hint or trick please share leave a comment.
These directions came from Amy from U Stamp for fun her blog is here http://ustamp4fun.com/autumn-days-stair-step-card/ She has a site full of wonderful tutorials, I will be spending time going through it. She has given me permission to use her instructions. Hope you enjoy, I already used this style to make 2 cards tonight for my parents...one was used to hold a gift card.
Autumn Day Stair Step Card
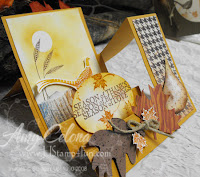


This simple "Stair Step" card was inspired by a swap I received at convention. I thought that it was a unique way to show off several layers of interest before main card. And it stands nicely too! I’ve seen it before without the side ‘bar’ (seen here with herringbone patterned paper) however without it, it isn’t very strong. You can be sure the you’ll see me use it more.

SETS: Autumn Days, Harvest Home, Woodgrain, Itty Bitty Bkgnds
PAPER: More Mustard, Vanilla, Close to Cocoa, Autumn Meadows Designer Series Paper
ACCESSORIES: Sizzix Big Shot, Sizzix ‘Originals” Leaves #2 die, Ovals die, Two standard cutting pads. Basic Brown ink, sponge daubers, More Mustard ink
Markers: Real Rust, More Mustard, Close to Cocoa, ¾ inch circle punch, Natural hemp, Dimensionals
MEASUREMENTS
5 ½ x 8 ½ More Mustard cardstock (scored as shown in diagram)
–Scored on the 5 ½ side at 2 inches
–Scored on the 8 ½ inch side at 2 ¼, 4 ¼, 5 ½, 6 ½, 7 ¼
3 ¼ x 4 More Mustard cardstock (to frame focal image)
3 x 3 ¾ Vanilla cardstock (for focal image)
3 ¼ x 1 inch ‘rustic wood’ paper “Autumn Meadows” DSP
4 x 2 Vanilla cardstock (to stamp pheasant & leaves for cutting)
2 ½ x 3 ½ Vanilla cardstock (to cut Sizzix Oval)
3 ¾ x 2 inch Cocoa (for Sizzix leaf)
3 x 2 ¼ golden woodgrain design “Autumn Meadows” dsp
1 ¾ x 4 brown checked design ‘Autumn Meadows” dsp
Score on lines shows in diagram, then cut from 2 1/4 to 7 1/2 along 2" score. Bend and fold accordingly. Use photos to help you bend.
My personal notes: don't make back part to high and heavy it causes whole thing not to set right. This card looked complicated but I learned was very easy to make. I also like that you take one sheet of 8 1/2 x 11 and you can make two cards out of it.

Great tutorial, and your card is soooo cool! :)
ReplyDeleteI would love to take credit for this card, but I was given permission to have this tutorial by Amy from U Stamp for fun. I did try it a couple times, I have to remember to start adding photos.
ReplyDelete