Someone in one of the groups I am in found this very much and way to cute tutorial. And Melin who created this amazing tutorial is allowing me to post this on my blog. I am so thrilled!!! I had seen this a while ago but had lost the link (before I decided to start this blog so I wouldn't lose great ideas like this). Today it was shared again and I jumped on the chance to ask permission. Here is where the original tutorial is posted http://www.scrapbookeden.com/makingfacestutorial.htm. She asked that I also add her blog, well of course who knows what we will find there!! So here is her blog http://www.cookingwithcricut.blogspot.com/ I just took a peak over there and she is really talented. Even one of her design team members is guest designer for Peachy Keen (my new addiction). So without further delay - the cutest tutorial you will ever see.


 I build my faces straight. I usually tilt the finished head on the body slightly. This will give the pieces a more whimsical look. But when building. I just build straight up and down.
 I will place the bottom of the eyes close to the nose and tilt them slightly inward towards the top.


Here is a shot of the different size pom poms that I will typically use.

Next, you will use your applicator and the smallest pom pom and get some black chalk.

You will apply it around the outer edge of your eyes.

Doing this will give the eyes a more realistic appearance and the illusion of being "set in" the face.

Here is a photo of the black dry chalk on. I purposely left the right darker to show you...

That you can ERASE the dry decorator chalk. I use a white artists eraser to remove excess chalk. It is very forgiving to work with :-)

Next, I use a White Signo Gel Pen to apply the white embellishments on the face. I HANDS DOWN prefer this over any other white gel pen out there. I have tried MANY of them, and they just don't work for me like this one.

Here I am applying the "glint" on the eye. I will usually put the "glint" on the upper inner part of the eye.

Next I will apply a "Moon Sliver" at the bottom of the eyes.

Then finally "shine" marks on the nose. The thickness and style will vary depending on what the final piece is conveying.

NOW the EYELASHES. This is the one element aside from the mouth that people are most intimidated with. This is where having the right pen helps ALOT. I use the American Crafts Precision point pens. They come in a nib size of as small as .001. That is TINY. If you can get your hands on one of them or even the .01 to start with, that would be the best. OR if you are a heavy handed.

Here is where....practice makes perfect. Just get a scratch piece of paper and PRACTICE. Flick your wrist as you start so that your stroke gets lighter towards the top.

As you are applying your eyelashes, you want to "stagger" the length of each one and give them a slight curl. This will give them a more realistic look. Imagine that you are applying mascara :-)

Now onto the mouth. This is also an area that will really concern students. My best advice, use a PENCIL...lol! It really is OKAY! Draw lightly the line from the nose. If you don't like it...guess what? You can ERASE it and try again!

From the line I will draw the mouth. I purposely went crooked to show you that it really is okay to rethink your lines.

Once you're happy with your pencil lines, simply go back over it with your fine tip black pen.

After that, you can erase the pencil lines, your ink won't smudge. Just give it a second to dry.

Next I use a American Crafts Slick writer, Medium barrel.

I use it to fill in the black part of the mouth.

After that, I will use the American Crafts Red fine tip pen (.03) nib for the tongue.

Now it's back to the zig with a line of glue on the bottom of the ears.

Now I will use the medium pom pom and apply chalk. I apply some chalk to the cheeks. A nice light dusting in a circular motion.

I also apply chalk to the inner ears. As you can see when you do this, you will get some chalk "overdust" on the edge of your head...NO PROBLEM...

I will just erase it with the white eraser.

Lastly, I will use my Signo to apply some finishing touches.
 I will start with white eyes.
Using My A.C. slick writer (m), I will color the top two thirds of the eye with black.
 Here is what they look like, colored in with just the black marker.


Creating Faces Tutorial
by Melinda Beltran
by Melinda Beltran

Pebbles Inc Dry Decorator Chalk Set
Blue Glitter Gel Pen
Black Fine Tip Pen
Red Fine Tip Pen
White Signo Gel Pen
White Eraser
Pencil
Alligator Clip Chalk Applicator
Colorbox Cat's Eye Chalk Inks
Pom Poms
Punches or something to cut the shape of the eyes
Zig Chisel Tip 2 Way Adhesive

To start you will use Colorbox Cat's Eye Chalk Inks to edge the pieces of your face. I will typically use Chestnut Roan (can you tell, mine is pretty beat up..lol)

I use a direct to paper technique to "brush" the chalk in onto the outer edges.

View of what the "inked" pieces will look like.

Next, you will use either a punch or your Cricut or whatever you have that will cut the desired shape of the eyes. The eyes are also based on the size of the finished piece.

Here is a photo of the most common "eyes" I use.

Now, you will use your Zig 2 Way adhesive to apply adhesive to the back of your eyes and nose pieces.

When you allow this adhesive to dry before you put the pieces on your face, they are easily removable. This is great for when you are first starting out, That way, you can easily adjust the position of your eyes and nose.


Here is a shot of the different size pom poms that I will typically use.

Next, you will use your applicator and the smallest pom pom and get some black chalk.

You will apply it around the outer edge of your eyes.

Doing this will give the eyes a more realistic appearance and the illusion of being "set in" the face.

Here is a photo of the black dry chalk on. I purposely left the right darker to show you...

That you can ERASE the dry decorator chalk. I use a white artists eraser to remove excess chalk. It is very forgiving to work with :-)

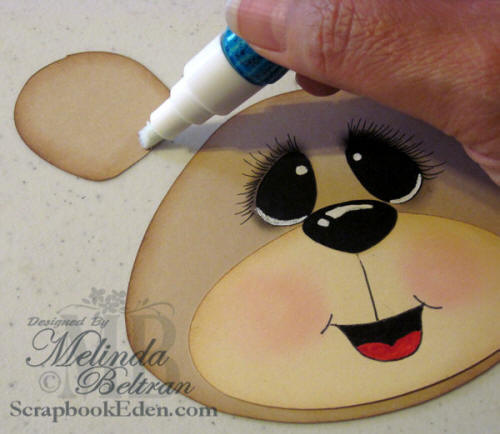
Next, I use a White Signo Gel Pen to apply the white embellishments on the face. I HANDS DOWN prefer this over any other white gel pen out there. I have tried MANY of them, and they just don't work for me like this one.

Here I am applying the "glint" on the eye. I will usually put the "glint" on the upper inner part of the eye.

Next I will apply a "Moon Sliver" at the bottom of the eyes.

Then finally "shine" marks on the nose. The thickness and style will vary depending on what the final piece is conveying.

NOW the EYELASHES. This is the one element aside from the mouth that people are most intimidated with. This is where having the right pen helps ALOT. I use the American Crafts Precision point pens. They come in a nib size of as small as .001. That is TINY. If you can get your hands on one of them or even the .01 to start with, that would be the best. OR if you are a heavy handed.

Here is where....practice makes perfect. Just get a scratch piece of paper and PRACTICE. Flick your wrist as you start so that your stroke gets lighter towards the top.

As you are applying your eyelashes, you want to "stagger" the length of each one and give them a slight curl. This will give them a more realistic look. Imagine that you are applying mascara :-)

Now onto the mouth. This is also an area that will really concern students. My best advice, use a PENCIL...lol! It really is OKAY! Draw lightly the line from the nose. If you don't like it...guess what? You can ERASE it and try again!

From the line I will draw the mouth. I purposely went crooked to show you that it really is okay to rethink your lines.

Once you're happy with your pencil lines, simply go back over it with your fine tip black pen.

After that, you can erase the pencil lines, your ink won't smudge. Just give it a second to dry.

Next I use a American Crafts Slick writer, Medium barrel.

I use it to fill in the black part of the mouth.

After that, I will use the American Crafts Red fine tip pen (.03) nib for the tongue.
Now it's back to the zig with a line of glue on the bottom of the ears.

Now I will use the medium pom pom and apply chalk. I apply some chalk to the cheeks. A nice light dusting in a circular motion.

I also apply chalk to the inner ears. As you can see when you do this, you will get some chalk "overdust" on the edge of your head...NO PROBLEM...

I will just erase it with the white eraser.

Lastly, I will use my Signo to apply some finishing touches.
Colored Eyes Variation


Next, using the blue glitter pen, I will apply a line of glitter under the black. You can also use other colored markers. Whatever you feel works!

Here is what a face with "Colored" eyes will look like. You can make them Green, Brown, Blue or even Violet. Just get as creative as you want.
I hope this explains how I do "those faces" Please don't think it is a lengthy process. With a little practice, you can whip these faces out in a couple of minutes....NO EXAGGERATING! Just patience and a little practice!
Thanks for allowing me to share :-)