I am so excited Christina from Card-Making-Magic has given me permission to post her tutorials on my blog. I have spent some time going through her site and she has a number of amazing tutorials. Here is the first one from her site it is a Double Slider Card technique and I think it is amazing and there is so much you can do with it. I wanted to have the link to the original tutorial but for some reason it won't work.. but here is the link to her website. I must warn you, grab a cup of coffee or tea and sit back because you will get lost for hours!! http://www.card-making-magic.
I cannot wait to try to this one. Hope you enjoy it!! As I go through her site I am sure I will find several more to share with all of you.
I have been asked many times to give a tutorial on how to make the Slider Cards, and there are lots of versions for these particular cards.
One of them is already on the website and can be found Here
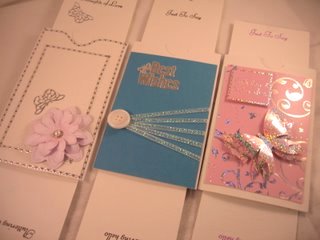 This version is the Double Slider Card and it uses a strip of a grocery bag. (I have used a pink one, as it shows up better in the photos.)
Use a thicker plastic bag as the thin ones aren't strong enough.
It is another card that can be used for any occasion and is adaptable for male or female cards.
It also suits any age group, so lots of choices open to you there.
But it needs some measuring to achieve...so get the ruler out!!
I have also been asked to give the measurements in inches(") as well as centimetres(cms), so I have obliged as best I can.
But work in one or the other, don't mix them up on the same card.
And as always make a Template until you are confident with the card.
 Step 1
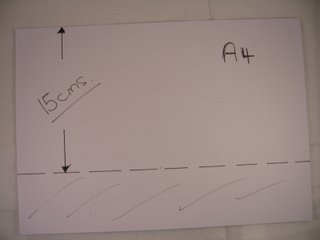
So the first thing you need to do is to trim the bottom off your A4 card, to 15cms (6")
Don't discard these bits as they can always be used for Matting and Layering.
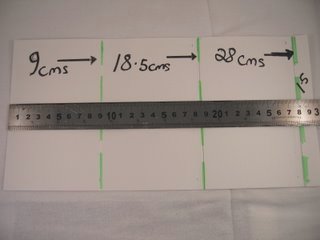 Step 2 Lay this piece flat down and from the left side of the card measure in 9cms (3 1/2"), 18cms(7 1/4"), and 28cms (11").
The bit that is left over should be about 1.5cms (1/2")
 Step 3
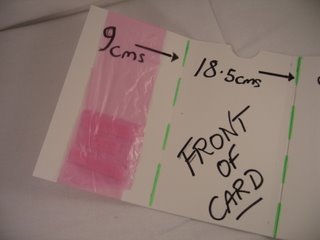
The green lines are where you will score and fold the card.
The centre panel will be the front of the Double Slider Card.
Into this panel I have used a circle punch to cut away a half circle at the top.
This will allow the recipient to pull the slider.
You will need a strip of grocery bag to fit around the left panel.
With double sided tape secure the two ends together, one on top of the other.
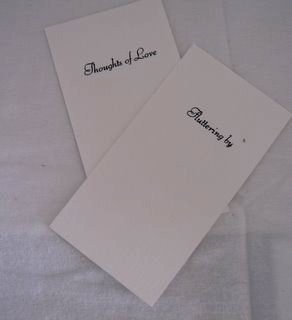 Step 4 Now cut two pieces of card 8cms (3 1/4") x 15cms(6")and stamp your message onto these.
Don't stamp too near to the top, as this is the part that will be the slider.
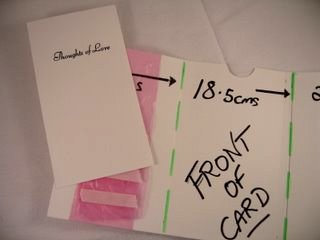 Step 5
To fit the first panel into the card, open it out flat, and add some double sided tape to the bottom of the grocery bag strip, and attach the panel neatly to this.
It needs to be fitted so that the words will show at the front of the card when the slider is pulled.
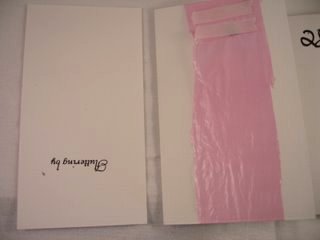 Step 6 Close the card up and fit the other stamped panel to the top of the strip with double sided tape.
Keep your stamping to the bottom and when this is now laid onto the panel the words will be inside the card.
Make sure they face the front.
Close the card up, without glueing it, and have a dry run to test the mechanism.
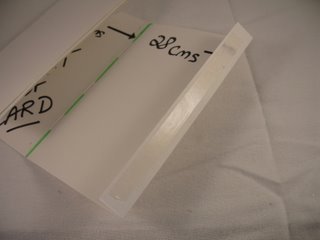 Step 7
On the narrow edge run a narrow line of wet glue, carefully, and close the card up.
(Double sided tape dries out and the card will soon break open.)
You will need to tuck this edge behind the slider mechanism, or it won't work.
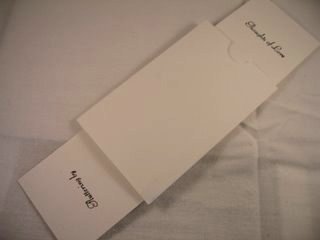 Step 8 Once the card is sealed test the mechanism again and it will work more freely with use.
When the slider is pulled the message pops out at both ends of the card.
You can add a ribbon pull to the top, where the cut out is.
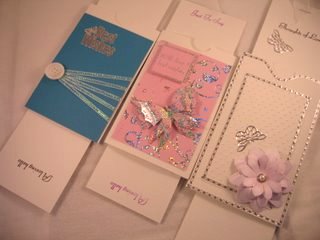 Now you can add any Embellishments that you have in your "Stash".
Make another panel from Specialised card and add it to the card.
I hope you enjoy making this Double Slider Card.

My personal notes: I have also seen tutorials which use small ziplock sandwich bags.
I cannot wait to try to this one. Hope you enjoy it!! As I go through her site I am sure I will find several more to share with all of you.
I have been asked many times to give a tutorial on how to make the Slider Cards, and there are lots of versions for these particular cards.
One of them is already on the website and can be found Here
 This version is the Double Slider Card and it uses a strip of a grocery bag. (I have used a pink one, as it shows up better in the photos.)
 Use a thicker plastic bag as the thin ones aren't strong enough.
It is another card that can be used for any occasion and is adaptable for male or female cards.
It also suits any age group, so lots of choices open to you there.
But it needs some measuring to achieve...so get the ruler out!!
I have also been asked to give the measurements in inches(") as well as centimetres(cms), so I have obliged as best I can.
But work in one or the other, don't mix them up on the same card.
And as always make a Template until you are confident with the card.
 Step 1
 So the first thing you need to do is to trim the bottom off your A4 card, to 15cms (6")
Don't discard these bits as they can always be used for Matting and Layering.
 Step 2 Lay this piece flat down and from the left side of the card measure in 9cms (3 1/2"), 18cms(7 1/4"), and 28cms (11").
 The bit that is left over should be about 1.5cms (1/2")
 Step 3
 The green lines are where you will score and fold the card.
The centre panel will be the front of the Double Slider Card.
Into this panel I have used a circle punch to cut away a half circle at the top.
This will allow the recipient to pull the slider.
You will need a strip of grocery bag to fit around the left panel.
With double sided tape secure the two ends together, one on top of the other.
 Step 4 Now cut two pieces of card 8cms (3 1/4") x 15cms(6")and stamp your message onto these.
 Don't stamp too near to the top, as this is the part that will be the slider.
 Step 5
 To fit the first panel into the card, open it out flat, and add some double sided tape to the bottom of the grocery bag strip, and attach the panel neatly to this.
It needs to be fitted so that the words will show at the front of the card when the slider is pulled.
 Step 6 Close the card up and fit the other stamped panel to the top of the strip with double sided tape.
 Keep your stamping to the bottom and when this is now laid onto the panel the words will be inside the card.
Make sure they face the front.
Close the card up, without glueing it, and have a dry run to test the mechanism.
 Step 7
 On the narrow edge run a narrow line of wet glue, carefully, and close the card up.
(Double sided tape dries out and the card will soon break open.)
You will need to tuck this edge behind the slider mechanism, or it won't work.
 Step 8 Once the card is sealed test the mechanism again and it will work more freely with use.
 When the slider is pulled the message pops out at both ends of the card.
You can add a ribbon pull to the top, where the cut out is.
 Now you can add any Embellishments that you have in your "Stash".
 Make another panel from Specialised card and add it to the card.
I hope you enjoy making this Double Slider Card.

My personal notes: I have also seen tutorials which use small ziplock sandwich bags.

No comments:
Post a Comment