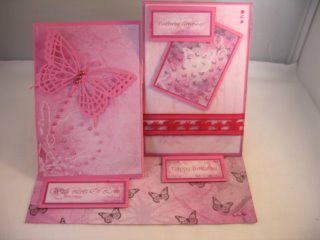
I have made a number of the regular easel card...but I love this double one. Christina from Card Making Magic has made this great tutorial - and isn't the card stunning also!!
Step 1
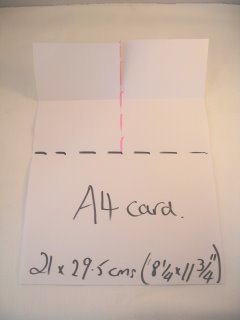
You will need an A4 card in the colour of your choice.
Then you will need to score and fold the card in half. (The black dashed line)
One of the halves then needs to be measured in half, but don't crease it.
(The pink dashed line shows where you need to CUT the card)
Step 2
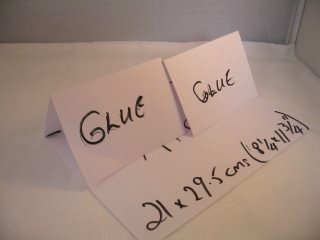
The piece of the card that you have cut needs to be creased and folded in half, so that it stands as pictured.
You will now have two equal sized panels.
The photo shows where you will need to add the glue...to the lower part only.
I use a wet glue for strength.
Step 3
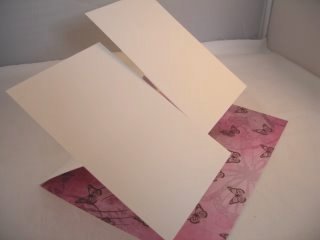
Measure two more panels from seperate card to fit the front.
They need to be no bigger than the actual card so that you can get it in a standard envelope.
I find it easier to lay the card down to attach these pieces of card.
 Step 4 Cut two pieces of pretty paper slightly smaller than these panels and Mat and Layer them onto the easel part of the card.
Line the bottom inside of the card with some pretty paper of your choice.
You will need to make two centre pieces and place them on some deep foam pads or silicone glue to raise them up.
These are the pieces that will hold the easels open.
I have added a mine at different levels so that the easels are staggered.
I have added some Ribbon to one of my panels.
But you can add any embellishments you may have in your stash.
I have added some Pearls for the Butterfly trail.
I hope you enjoy making this lovley Double Easel Card, and don't forget to add the photos to the Gallery


Step 1
You will need an A4 card in the colour of your choice.
Then you will need to score and fold the card in half. (The black dashed line)
One of the halves then needs to be measured in half, but don't crease it.
(The pink dashed line shows where you need to CUT the card)

Step 2
The piece of the card that you have cut needs to be creased and folded in half, so that it stands as pictured.
You will now have two equal sized panels.
The photo shows where you will need to add the glue...to the lower part only.
I use a wet glue for strength.

Step 3
Measure two more panels from seperate card to fit the front.
They need to be no bigger than the actual card so that you can get it in a standard envelope.
I find it easier to lay the card down to attach these pieces of card.
 Step 4 Cut two pieces of pretty paper slightly smaller than these panels and Mat and Layer them onto the easel part of the card.
 Line the bottom inside of the card with some pretty paper of your choice.
You will need to make two centre pieces and place them on some deep foam pads or silicone glue to raise them up.
These are the pieces that will hold the easels open.
I have added a mine at different levels so that the easels are staggered.
I have added some Ribbon to one of my panels.
But you can add any embellishments you may have in your stash.
I have added some Pearls for the Butterfly trail.
I hope you enjoy making this lovley Double Easel Card, and don't forget to add the photos to the Gallery


No comments:
Post a Comment