About the creators

I wanted to take a moment and thank all of the people that have allowed me to share their work. All of the postings have the links to the original posting - click on the name of their site. If you find something that you really enjoy please take a minute to go to their site and leave them some love!! Without them, without their permission this would not exist. I try not to get to many from one person - unless what they have is so unique. I do not get anything in return from them...but let them know you found them here with me Jackie at Glitter Fantasies.

Saturday, February 26, 2011

Sew Easy


If you haven't heard about this amazing little gadget and you love the "sewed" look on cards...well here you go!!!! Small, affordable, looks like it is easy to use, using floss not thread (I can imagine it would look really great with floss). Needless to say this is going on my "wish list"..I cannot imagine dragging out my sewing machine and all the hassle for one minute on a card - However, with this you know I will...hehe and I have tons of embroidery thread already!!
Now of course you can find it anywhere, but here is We R Memory Keepers link for it  http://www.weronthenet.com/sew_easy

I was looking around online for images or something to so that you could get an idea on what it did.

Friday, February 25, 2011

Birthday Petals Card

I didn't realize that the other post didn't include directions for the best part - the flower!!! So here it is....Enjoy!! Dawn is making my wish list longer and longer.. I am going to need a par time job so I can get all of the goodies!! Here is original posting...enjoy! http://www.dawnsstampingthoughts.net/2011/02/birthday-petals-card-.html


Birthday Petals card front
Hi Stampers :

 Happy Monday Friends & Happy Presidents Day !
I finally got to use my  Blossoms Petals punch# 121808  along with the 
 Build a Blossom stamp set
  • (c) # 121994
  • (w) # 121923
Love them both !
I use Baja Breeze card stock #111352   and Baja Breeze classic ink #111833   for my card  today.
 I am going to show  you  the inside of my card  later this week via video .. so stinkin cute :)
The Birthday  greeting is from the  stamp set  called
Bring on the Cake
  •  # 121958 (c)
  •  # 121899 ( w)
I also used the  Framed Tulip embossing folder #121809
I addeda small strip of Springtime Vintage  designer paper # 121782  as well as a few Basic Rhinestones #119246.
To  finish off the pretty flower I added lots of Dazzling Diamonds # 102023
Have a Marvelous Monday friends. See you  tomorrow
Until later... Happy Stampin!
 Order Stampin' Up! Online

Pop Up Gift Card Holder

When Dawn first sent out the email regarding this card I went crazy over the flower - absolutely loved it!! And of course I couldn't wait for the tutorial I emailed her right away on how to make it. The instructions for the card are on another post called Birthday Card Petals...I normally try to avoid tutorials that require you to buy a certain product but this one is breaks the rule - I hope you love it as much as I do so head on over and let Dawn you that you need to have the set as well.
Onto the card itself, I thought this idea was really interesting and she makes it look so easy...guess I will find out!! Here is link to the original tutorial http://dawnsstampingthoughts.typepad.com/dawns_stampin_studio/2011/02/pop-up-gift-card-holder-video-.html

And now...how to make this amazing card to go with all those gift cards we just love to share!!

Pop Up gift card holder video ...

Birthday Petals card front
Hi Stampers :

 Here are  the supplies I will be using in todays video :
Baja Breeze card stock # 111352
  • cut at 5 1/2" X 8 1/2" ( card base )
  • cut at 5 1/2" X 6" ( inside of card)
Sticky Strip#104294
Bone Folder # 102300
Birthday Petals card inside
Birthday Petals card side view
Finished card  front details click HERE

Until later.. Happy Stampin!


Order Stampin' Up! Online

Making Bottlecap Embellishment

I have been checking out Cindy's blog which is http://creativepointe.blogspot.com/ , you really need to check out her blog she does a number of techniques I know I would like to try. She has a lot of really great ideas but this one really caught my attention and how cute is it!! I have used Mode Podge a few times but I really love the results from using this one Dimensional Magic. I cannot wait to find it and try making my own bottlecaps...LOL to think of all the bottle caps we use to toss out when we were younger...do they even make them on soda bottles anymore?? I just loved this idea and I hope you enjoy it as much as I did...as always here is link back to original tutorial http://creativepointe.blogspot.com/2011/02/technique-embellishments-with.html.

And here it is...bottle caps embellishments!!

First let me show you what she did with it..gotta love this tag!!!


HOW TO MAKE THE BOTTLECAP EMBELLISHMENT:

1.  Using a 1-inch circle paper punch, punch out your design.  I stamped the "Life" on regular cardstock with waterproof ink.  You could also use pre-printed artwork or stickers.

 2.  Punch out three 1-inch cardboard circles.  I used cereal boxes.  Glue the three cardboard circles together and then glue your design to the top of those.  Glue the entire stack in the bottlecap.  I used regular paper glue to make the stack and hot glue to adhere the stack to the bottlecap.  You could use more or less cardboard, depending on how deep you want your design in the bottlecap.

3.  Carefully squeeze the Dimensional Magic into the bottle cap.  I filled it to the top as shown to the right.  After it dries, there may be a "sink hole" in the middle.  Just fill again to the top and let dry.

As I mentioned, it is very difficult to get any bubbles out so do all you can to not have any there in the first place.  I found that if you do get bubbles, take a Q-tip or your finger and drag the bubble off to the side.  You can't pop them with a pin or burst them by blowing on them.


Here are some things I've used Dimensional Magic on.  The first piece I did was the upper right pendant.  It filled in the pendant frame really nicely.  I also created some plain circle embellishments.  Dimensional Magic also makes a nice finish on domino pendants (A project for making these coming soon!).


Tuesday, February 22, 2011

The BEST way to store ribbon

Well I have been busy poking around Becca's site, Amazing Paper Grace and as you most likely noticed I have a few posts about her. Well, I thought her ideas were pretty good and knew that for storage I had found what I was going to do as well as completely love her projects! And as always here is the link to the original posting http://www.amazingpapergrace.com/amazing-ribbon-storage/

However, after seeing this idea for storing ribbon (which I have far to many rolls) I have the under the bed bins (3 of them), half a dozen large boxes plus several of the huge bags from shopping full of ribbon. Until now I was going to use the ribbon rings but dreaded at how many I would need. I already own 3 of the 3 drawer storage containers that are close to what she has. Needless to say I am over the top about this idea and cannot wait to get all of my ribbon organized. I guess you want to see what she came up with...well here it is!!

Amazing Ribbon Storage That I Absolutely Love

by Becca Feeken on February 23, 2008
Can I tell you that I am a ribbon-aholic?  I don’t know what it is, but when I see it, I just have to have more.  Even worse when I’m working on a project I don’t always feel like I have just the right ribbon.  Yup,…never fear, I’ll just get more.  Then, just how to store it?  Well, I have tried everything….rain gutters, tossing all in a big jar, ribbon rolls on cafe rods…and I found that my collection was just too unwieldy.  After thinking about, I decided that it’s the round rolls that make up all the bulk so I took the plunge and decided to get rid of that bulk.
To begin I purchased one of these three drawer units from Michaels for around $10.00, a package of small black hair rubber bands and purchased a sheet of mat board which I cut down into pieces measuring 2.5″ wide by 2″ high.  I decided on the matboard because I found cardboard bobbins you can purchase at the craft store to be too small and too flimsy.  I divided the drawers into four sections by putting in three 13″ pieces of matboard and anchoring them with tape.  I rolled all my ribbon that were lengths of 5 yards and less onto the bobbins that I had cut.  Now, just a warning, the rolling of the ribbon takes a little bit of time.  I saved it by rolling when I was watching TV and even carried a small bag of ribbon and bobbins in the car to roll while I was waiting in the car or at the doctor office.
But here’s the thing…..it’s 
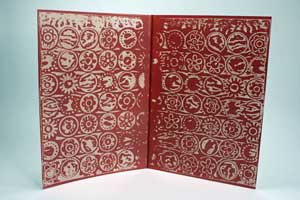
amazing the amount of ribbon one three drawer unit will store!  In the picture below, 1 drawer can hold 140 rolls of ribbon; this particular unit is storing more than 400 rolls of ribbon!!  I love this storage because I can pull a drawer or the entire unit and set it on the edge of my workspace.


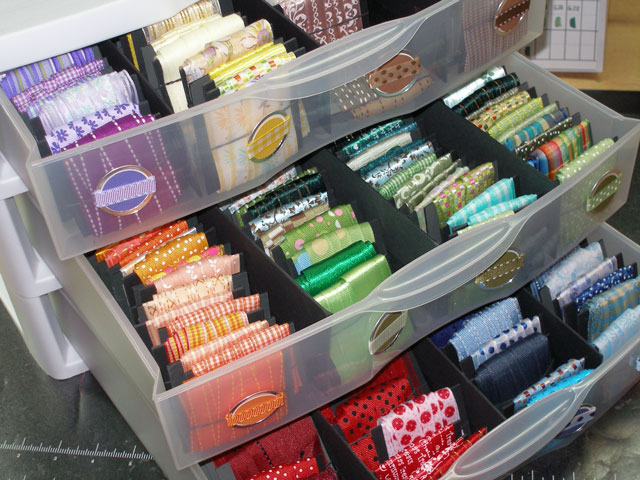
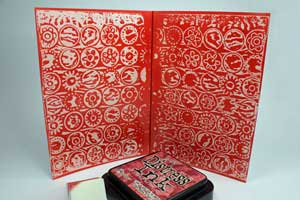
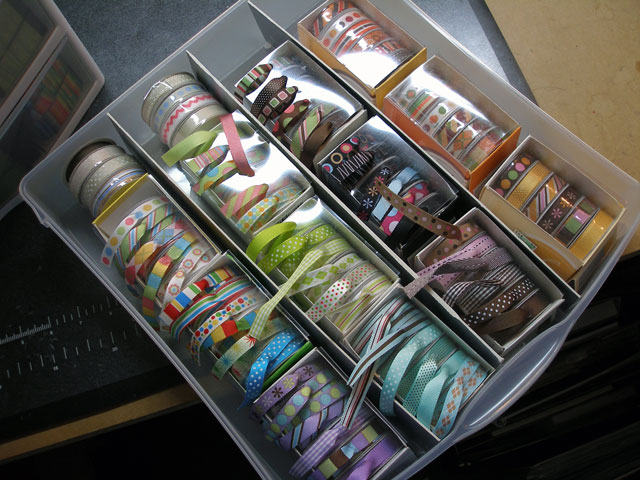
Here are the drawers opened up to show how easy it is to pack and stack the ribbons inside the drawer.


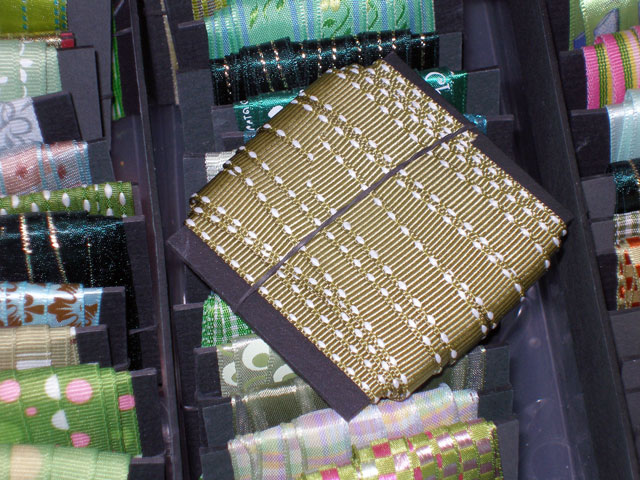
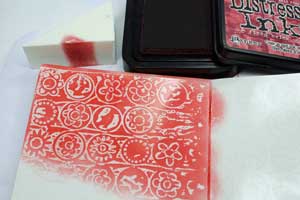
Here is what one of the individual bobbins looks like.  It is simply a piece of matboard cut to 2.5″ x 2″ secured with a rubber band.


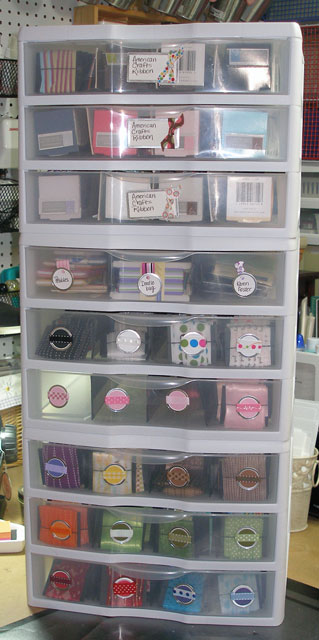
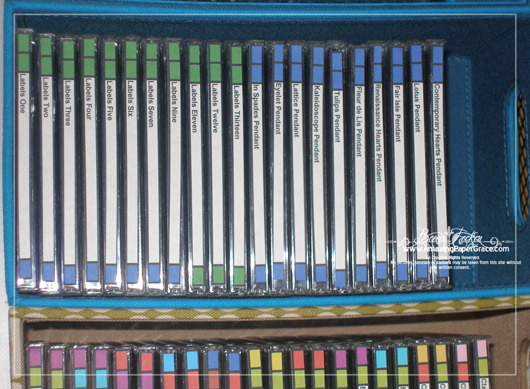
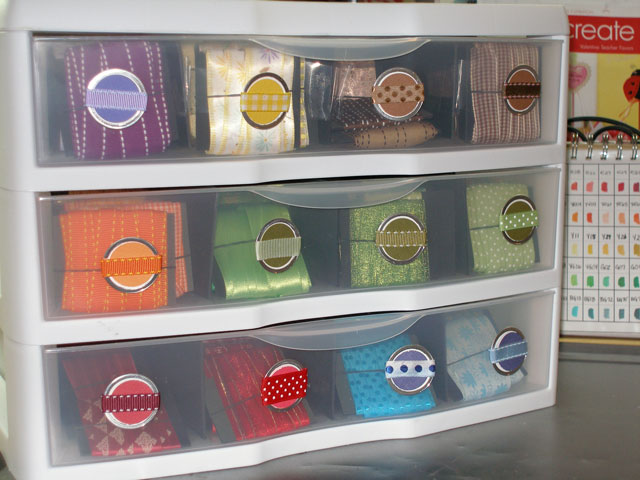
I have three of these units all together.  The top drawers are devoted to my American Crafts Ribbons.  Those are not stored on bobbins.  The rolls are smaller and since they come packaged in sets of six, I wanted to keep each mini palette together (shown below).


Even storing the American Crafts as full ribbons, I can get a whopping 88 rolls in one drawer!


Perfect Reinker Palette

While I was on Becca's site I came across this and thought what a creative way of keeping your inks. And of course my favorite - inexpensive!! If you haven't figured it out, cost and convenience is top priority for me. So without further delay here is what Becca came up with to keep her inks organized and at her fingertips!! And of course the link back http://www.amazingpapergrace.com/perfect-reinker-palette/.


Do you want to learn how to take this inexpensive watercolor set and convert it into a great storage/organizer for your ink bottles....follow the link above and let Becca show you how!

Watercolor Paint Pallette


Ranger Color Chart

While I am in the middle of organizing I found that several companies actually have charts that you can download and mark which ones you have. So I decided that I would keep track of all the ones I have found - please let me know of any you have. I am going to label them all Organize and Color Charts with the title being company name.
So first off we have Ranger!!! Here is actual link to site http://www.rangerink.com/labels.htm

Ranger Ink Pad Label Sheets

Ranger has made it easier for you to organize your ink pads! We've created PDF files of the most popular Ranger dye inks - Adirondack®, Archival™, Distress™ and Jenni Bowlin for Ranger inks.
These files were designed to work with Avery brand 5267 labels (or other brands that have a similar size label--one and three quarters inch by one half inch, 80 labels per sheet).
Adirondack PDF Label Sheet
Archival PDF Label Sheet
Distress PDF Label Sheet
Jenni Bowlin PDF Label Sheet

NEW! Ranger Color Swatch Charts


Print these helpful grids on letter-size (8½ x 11") card stock and apply your Ranger inks, paints, and glitter glues in the appropriate squares to create colorful reference charts!
Adirondack Acrylic Paint Dabbers Color Chart
Adirondack Alcohol Inks Color Chart (print on glossy paper)
Claudine Hellmuth Studio Paint Color Chart
Liquid Pearls Color Chart
Perfect Pearls Mists Color Charts (spray mists onto 1-1/2" x 1-1/2" black cardstock squares and adhere to chart)
Stickles Glitter Glue Color Chart
Tim Holtz® Distress Ink Color Chart
Tim Holtz® Distress Stickles Color Chart
For your convenience - and mine hehe here is list of links they have at this time.


Storing Spellbinders

Well now that I have become addicted to Spellbinders I have been looking for ways to store them. It must be both economical and functional...so what to do. I have found several different ways but I have not picked which way I am going to do it..but I figured I would share some ideas. Now everyone knows about the storage things that Spellbinders has...but as the crafter's we are..we always want to find another way.

Up first - and so far I must admit I love this way for oh so many reasons - check it out this is from Becca at Amazing Paper Grace. The following is from her blog http://www.amazingpapergrace.com/spellbinders-storage/.

My Spellbinders are one of my most used tools and I have a hefty investment in them so I want to make sure they get their use.  My Spellbinders storage probably looks like your Spellbinders storage, the fat CD cases make for perfect storage!   But, I found that after I color coded mine – I had a solution that really, really worked for me and it has saved me time and frustration.  When I’m in the middle of creating, my desk becomes a mess and I could never seem to put my hands on the dies I needed – now they each have a place.
I group my dies in categories – Standard Shapes, Pendants, Labels, Flowers, Nested Shapes, etc.  All of my circles are all stored together and at the top of the label I left a place for two colors – the first color is the same for all circles – the second color changes depending on if it is a smooth circle or a scalloped circle.  All of my scallop shapes have a lime green label so that I can find them.   If you ever decide to color code yours, tailor the colors to what works best for you.  Below you can see some of the items I used and the pictures are clickable if you want to see a larger version.

I keep my storage within an arms reach of where I sit because I access them frequently.  Here I’ve stacked up CD holders that I purchased at Target.
I also store my Borderabilities and long dies within an arms reach.
Here you can see the color coding a little bit better.
I simply make an excel spreadsheet, drop in the colors and cut the grid out so that it can be applied to the  spine of the CD.   These are ready to apply.
The spreadsheet is printed on an inkjet printer on Full Sheet Avery Labels (8165) before being cut out.  This is what I started out with.
For the longer nested dies I use CD Cases – I covered them in another post HERE.
I simply apply my spine label to the front of the CD Case.
I store my 6″ borders in a magnetic album.
This one was picked up in the scrapbooking section at Hobby Lobby.


Spellbinders Ruffled Flower Medallion Tutorial

Hello everyone!! You have to check out this amazing tutorial! I love it, and she makes it look so easy...I shall find out now won't I. I had seen a flower like this somewhere but could never figure out how to make it... I accidentally stumbled across Becca and her site Amazing Paper Grace. As I was just browsing around I found this tutorial. Take a minute and head on over to her site I am sure you will love her work as much as I did. Take a minute to look around..it is how I found this! Here is link to the original tutorial. http://www.amazingpapergrace.com/spellbinder-ruffled-flower-tutorial/


Supply List:
Spellbinders Large Scalloped Octagons Scissors
Two sided design paper Invisible tape
Bone folder or optional Scorpal Long reach hole punch
Large Brad or Threaded Button Glue Dots
A friendly reminder, it takes a lot to put together pics and such for tutorials and I offer this tutorial up in the spirit of sharing.  Most people are grateful and offer credit where credit is due.  Because others may want to sample my other tutorials, I encourage and welcome link backs to this tutorial, you do not have to ask permission.
Using Spellbinders Scalloped Large Octagons, cut/emboss one of the largest size, cut/emboss three of the second largest size and cut/emboss three of the second from smallest size.  Set the largest scalloped octagon aside, we will use it later.

(Optional) To prepare your cut shapes for scoring, align the flat edge of the scalloped octagon shape with the top of your Scorpal.

Score straight down through the shape.  This score line will fall between the second and third scallop on each flat side of the octagon.

Each scalloped octagon will have four scored lines.

Using a long reach punch, set a hole in the center of each octagon, this will prevent the paper from tearing when folding.  Then snip along one score line down to the center cut hole.

Fold each of the three pieces of the medallion.  The first fold will be a mountain fold where the fold will rise above the cut edge.

Alternate mountain folds with valley folds so that each piece looks the same as that shown below.

With a bone folder, burnish the edge of each fold so they are sharp and crisp.

Using invisible scotch tape, place one piece of tape underneath your first piece of medallion with the sticky side facing up.  The tape will end up on the underneath side of the medallion and fairly inconspicuous.

Marry the second piece of your medallions to the first by placing side by side on the upward facing sticky side of the tape.

Do the same with each seam.  There will be a total of three seams.

Cut a center hole in the scalloped octagon piece that we set aside.

Put glue dots on the bottom of your medallion.  I found that six glue dots was plenty, one on every other fold.

Flip medallion over and secure it to the bottom piece that had been set aside.

Construct another medallion using the three small scalloped octagons
.
Seat the smaller medallion on top of the larger medallion, matching folds.

Put an embellishment like a brad or threaded button through the aligned center holes.

Voila!!!  Your medallion is finished, it just needs to be adhered to something.  These can be made in any size and can also be made with round scallops however the scalloped octagons are easier to work with and look prettier in my humble opinion.  You can add as many layers as you want and if you want a more rufflier medallion, thow in another folded piece.

Here’s what I did with this one.  I’m done buying bows for gift bags — too often the bow cost more than the bag . . .  Now I have a very cost effective alternative.  I hope you enjoy making medallions, once you get used to the process, they move along very quickly.

PSA Essentials

I had seen this a while ago and wasn't 100% sold on it. Don't get me wrong I thought it was a really great idea and cost didn't make me fall over. But I just wasn't there....until!! You Had Me at Craft did a video on how to make an envelope and she used her monogram to make an envelope seal. That sold me, she layered it onto a larger scalloped circle and it was so adorable yet really sharp looking. I am always stumped at how to seal envelopes, esp when the cards are kinda bulky..thick?? This is perfect for that, it is a nice enough size for the seal to really keep it closed. They have a ton of different things...check it out for yourself..never know??? Hmmmm I wonder if you can heat emboss their ink??? I will have to find out!!
Here is link for PSA Essentials...  http://www.psaessentials.com/
I wanted to give you an idea of just how amazing these are so I grabbed a couple images from the site, the outer rings are interchangeable as well as the inner rings so you can mix and match. They also have a variety of colors, even combos for inner and outer parts. You can also do personalized ones - such as your address on outer ring, or handmade by ...can you imagine the endless possibilities. I thought it would be great to have handmade by personalized on inner and outer rings both. They have a nice selection of premade packages...even Rudolph!! Hehe can you tell I am completely excited about these.


Monday, February 21, 2011

Which ink pad to use

I often wonder about which ink pad to use for what...well a member of one of the groups I am in asked this same question...here are some answers...if/when I get better answers I will update this - but in the meantime here are some ideas.

Versafine for watercolouring
Memento for copics/promarkers/prismas/
polychromos
Stazon for acetate
SU, adirondacks, big & juicys & distress inks when I want to colour stamp, sponge/brayer/brush colour over the paper. I quite like using them to watercolour with as well.
And of course Ranger Rick ink!!! I think this can be used everywhere.

PIGMENT INK PADS
Pigment ink pads are probably the most favourite type of ink pad
every stamper has in their craft box. Pigment pads are made of a high
density raised foam pad. Use them to ink any size of rubberstamp; if
the stamp doesn't fit on the pad, ink the stamp by pressing the pad
onto it.
The most commonly used pigment pads are the economical INK CUBES.
These cubes are 1" square and can ink both large and small stampers.
Pigment ink is a very slow drying ink which is best used for
embossing with (see "how to rubberstamp emboss") You can use it
without embossing but you must use non glossy paper so that it will
dry, drying time can take up to a day but you can actually speed this
up by applying to a heat source. If you plan to stamp on a glossy
type of card you must emboss as the ink will NEVER dry otherwise.
However once you have embossed the image is waterproof thus enabling
you to add watercolours or even brushmarkers to hi-light your work.
The advantages of pigment pads is that they are available in
virtually every colour of the rainbow. Most importantly in METALLIC
colours, no other ink pad is available in metallic colours (yet!) The
larger pigment ink pads are also available in what is known as
RAINBOW PADS, these pads consist from 3 to 10 colours on one ink pad.
More and more combinations are being developed all the time. If you
would like to stamp with a metallic pigment pad but don't want to
wait for it to dry, check out the new range of ENCORE pads available
on the craft market, these single colour metallic and rainbow
metallic pads promise to take virtually no drying time at all.
DYE BASED INK PADS
Dye based ink pads are perfect for glossy papers and card, this type
of paper literally makes the colours of the dye based pads come
alive. Dye based pads are typically made of a compressed fabric and
their surface is raised to enable you to ink any size of stamp. These
are also available in 1" cubes as well as the larger size.
Dye based pads are generally not waterproof which means you can't add
colour from a wet source; for example watercolours or brush markers
as the ink would smudge. That is true of most dye based ink pads with
the exception of the MEMORIES range. These are designed for water
colouring with. Dye based ink pads come in all colours including
rainbow. One particular range of dye based rainbow pads is the
KALIEDACOLOUR brand name, these consist of a snap together palette of
colours which you separate when not in use to prevent them from
bleeding in to each other. Allow dye based inks to dry before adding
colour to them as the ink pads can smudge, again this can be speeded
up by the use of a heat source.
FABRICO INK PADS
Fabrico ink pads were originally intended to stamp onto fabric. You
can also use to stamp upon wood, glass, acetate and shrink plastic.
Simply apply to a heat source to make permanent when you have
stamped. Like pigment pads, fabrico are of a compressed foam texture
which is raised to allow you to ink up any size of stamp. Available
in both 1" cubes and larger sizes. Check out the lovely range of
rainbow ink pads.
PERMANENT INK PADS
As their description suggests permanent ink pads are for stamping
when it needs to be permanent. Use to stamp on shrink plastic, wood,
even glass. As a rule permanent ink pads tend to dry out very
quickly, bearing this in mind it is best to purchase a dry uninked
pad and a bottle of permanent ink. Ink up the pad a little every time
you wish to use it. Only available in black, and to be honest with
the invention of fabrico ink pads these permanent ink pads are
becoming less popular.
EMBOSSING INK PADS
A lightly tinted ink pad which is especially used for embossing with.
The ink dries clear, the main advantage of using an embossing pad is
if you wish to add a clear shiny embossed stamped image to your paper
or card with either clear or glitter embossing powders. The majority
of stampers today tend to use pigment pads for embossing with rather
than embossing pads.


What Color Ink Pads Should I get?
If after that low down on ink pads you are still none the wiser about
which ink pad to choose, check out our guide for recommended basic
beginners color choices:
Pigment Ink Pad Colors: GOLD, SILVER, COPPER, WHITE & BLACK. Plus
multicolour pads.
Dye Based Ink Pad Colors: BLACK Memories pad plus assorted rainbow
pads.
Fabrico Ink Pad Colors: Black and rainbow pads. 

Wax Paper Embossing Resist

I think this is the wildest idea!! And as soon as I can find my iron I have got to try this!!
I found this at Split Coast Stampers by Godelieve she did a really nice job on the tutorial as well. Here is original link http://www.splitcoaststampers.com/resources/tutorials/waxpapercuttlebugresist/

Combine Cuttlebug embossing with wax paper resist to create beautiful backgrounds.

Supplies

  • Cuttlebug™
  • Cuttlebug™ folder
  • Glossy cardstock (twice the size of Cuttlebug embossing folder)
  • Wax paper (size of Cuttlebug embossing folder)
  • Dye ink (I used the Fired Brick - Distress Ink from Ranger)
  • Make-up sponge
  • Iron
  • Paper towel or copy paper

Step-by-Step

  1. Step 1

    Emboss the wax paper in the Cuttlebug™ with an Embossing folder of your choice.
  2. Step 2

    Fold the glossy cardstock in half, and put the embossed wax paper inbetween.
  3. Step 3

    Cover the glossy cardstock with copy paper or paper towel, to avoid wax on the iron. Select “cotton” setting on the iron, no steam! Iron the cardstock.

    This will transfer the design from the wax paper on to the glossy cardstock.


  4. Step 4

    Remove and discard the wax paper. Begin sponging the Distress Ink on, using a circular motion. Apply enough ink to get an even color.


  5. Step 5

    Notice a positive and negative pattern, because both sides of the wax paper were used.


  6. Color looks less vibrant after a while.
  7. Step 6

    Finish your card.